How to use BabylonJS with Vue
It's really easy to use BabylonJS with Vue. This page will help you set up a minimal BabylonJS scene with Vue. We will cover both Vue 3 and Vue 2 using JavaScript.
Prerequisites
If you haven't created your Vue project yet, visit the official Vue documentation to learn how to set up a Vue project.
https://vuejs.org/guide/quick-start.html for Vue 3
https://v2.vuejs.org/v2/guide/installation for Vue 2
Please make sure that your Vue app was installed correctly and can run without errors. If you've created the Vue app using the Vue CLI, you can start your app by running npm run serve in your Vue app directory.
The goal of this tutorial is to show how to connect the two frameworks together, not how to use these frameworks on their own. You need to be familiar with both frameworks at a basic level to get started.
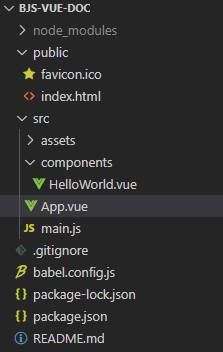
After installing and testing your Vue app, you should end up with a very similar directory structure for both Vue 3 and Vue 2:
Installing BabylonJS
We are going to use the newer @babylonjs/core ES6 package.
In your Vue app directory install the BabylonJS dependencies:
npm install @babylonjs/coreIf you want to use the BabylonJS GUI, you need to install:
npm install @babylonjs/guiIf you want to use the BabylonJS Inspector for debugging, you need to install another package (you can add this package as a dev dependency if you don't plan to use the Inspector in production):
npm install @babylonjs/inspectorYou can find more on installing BabylonJS here.
The Vue component
We are going to build a reusable Vue component that can be used to display a BabylonJS scene.
Create a file called BabylonScene.vue in src/components and add this:
Vue 3
<template>  <canvas ref="bjsCanvas" width="500" height="500" /></template>
<script>import { ref, onMounted } from "@vue/runtime-core";import { createScene } from "../scenes/MyFirstScene";
export default {  name: "BabylonScene",  setup() {    const bjsCanvas = ref(null);
    onMounted(() => {      if (bjsCanvas.value) {        createScene(bjsCanvas.value);      }    });
    return {      bjsCanvas,    };  },};</script>
Vue 2
<template>  <div>    <canvas ref="bjsCanvas" width="500" height="500" />  </div></template>
<script>import { createScene } from "../scenes/MyFirstScene";
export default {  name: "BabylonScene",
  mounted() {    const bjsCanvas = this.$refs.bjsCanvas;    if (bjsCanvas) {      createScene(bjsCanvas);    }  },};</script>
You can access the canvas through the this.$refs object in the mounted() callback. This is explained below for Vue 2.
In Vue 2, the template must have only one root element, so it is a good idea to wrap our canvas in a div element. This lets us add new elements to our template without breaking the original root element.
Create a directory called scenes in src. Create a file called MyFirstScene.js in src/scenes and copy the following code into the newly created file:
import { Engine, Scene, FreeCamera, Vector3, MeshBuilder, StandardMaterial, Color3, HemisphericLight } from "@babylonjs/core";const createScene = (canvas) => {  const engine = new Engine(canvas);  const scene = new Scene(engine);
  const camera = new FreeCamera("camera1", new Vector3(0, 5, -10), scene);  camera.setTarget(Vector3.Zero());  camera.attachControl(canvas, true);
  new HemisphericLight("light", Vector3.Up(), scene);
  const box = MeshBuilder.CreateBox("box", { size: 2 }, scene);  const material = new StandardMaterial("box-material", scene);  material.diffuseColor = Color3.Blue();  box.material = material;
  engine.runRenderLoop(() => {    scene.render();  });};
export { createScene };
We put the BabylonJS code in a separate file so we can use it anywhere.
Open src/App.vue, remove the HelloWorld.vue component completely, and add the BabylonScene.vue component. Or just replace the content of the file with the following code and rename it:
<template>  <canvas ref="bjsCanvas" width="500" height="500" /></template>
<script>import { ref, onMounted } from "@vue/runtime-core";import { createScene } from "../scenes/MyFirstScene";
export default {  name: "BabylonScene",  setup() {    const bjsCanvas = ref(null);
    onMounted(() => {      if (bjsCanvas.value) {        createScene(bjsCanvas.value);      }    });
    return {      bjsCanvas,    };  },};</script>
The ref value of the <canvas> element in the <template> must match the variable name used in the script. The variable in the script must be a ref and must be returned from the setup() function. In our example bjsCanvas.
Do not forget to access the HTMLCanvasElement using the value property of the ref variable (Vue standard). That's why we use bjsCanvas.value.
The DOM is accessible only after the Vue component has been mounted. This is why we need to init our scene in the onMounted callback in Vue 3 or in the mounted callback in Vue 2.
Now you can get rid of the example component and delete the file located at src/components/HelloWorld.vue.
The application is ready to be tested. Run your app using npm run serve, and you should see a blue cube on a 500x500px canvas in the upper-left corner.
Async scene
Sooner or later, you will need to create a scene that uses asynchronous functionality. It is very easy to set up such a scene with Vue. Just make the callback functions async and use any awaitable logic inside.
Vue 3
onMounted(async () => { if (bjsCanvas.value) { await createScene(bjsCanvas.value); }});Vue 2
async mounted() { const bjsCanvas = this.$refs.bjsCanvas; if (bjsCanvas) { await createScene(bjsCanvas); }},Typescript
Define the canvas reference like this for Vue 3:
const bjsCanvas = ref<HTMLCanvasElement | null>(null);or for Vue 2:
const bjsCanvas = <HTMLCanvasElement>this.$refs.bjsCanvas;rename the file MyFirstScene.js to MyFirstScene.ts and modify the file as follows:
const createScene = (canvas: Scene) => {CSS triggers
If you plan to use an HTML GUI overlay over the BabylonJS canvas, pay attention to browser reflows and repaints. Especially animated alpha transparent divs can degrade performance. You can read more about the topic in general here and have this cheat-sheet always prepared: CSS Triggers.
Vue reactivity, friend or foe?
If you want to expose scene information to Vue, keep in mind that exposing the "wrong" objects may put Vue and BabylonJS in a recursive redraw loop, which will dramatically degrade performance. As a rule of thumb, never make the BabylonJS Engine or Scene object reactive. If you suspect such behavior, test your scene without Vue.
Conclusion
It is easy to set up a very basic BabylonJS scene in Vue. Keep in mind that the golden rule applies here too. Building, changing, and testing smaller blocks of your application at a time will help you avoid many problems when using these two awesome frameworks together.
Where to go next?
If you don't want to pass data from Vue to BabylonJS and vice versa, you can stop here and, for example, visit our great Getting started page. Otherwise, jump to part two of this tutorial.
Links
All links from this tutorial at one place
Part 2 of this tutorial
Part 3 of this tutorial
Part 4 of this tutorial
https://github.com/RolandCsibrei/babylonjs-vue3-javascript-basic-setup
https://github.com/RolandCsibrei/babylonjs-vue2-javascript-basic-setup
A bit different approach with a window resize listener:
https://github.com/RolandCsibrei/babylonjs-vue3-javascript
If you landed on this page because you are looking for how to use BabylonJS with Quasar on top of Vue, we have a starter repo for you as well:
https://github.com/RolandCsibrei/babylonjs-quasar-vue2-composition-api-typescript