Managing Solid Particles
Properties
There are many properties you can set on a particle:
| Property | Type | Default |
|---|---|---|
| position | Vector3 | (0, 0, 0) |
| rotation | Vector3 | (0, 0, 0) |
| rotationQuaternion | Quaternion | undefined |
| velocity | Vector3 | (0, 0, 0) |
| color | Color4 | (1, 1, 1, 1) |
| scaling | Vector3 | (1, 1, 1) |
| pivot | Vector3 | (0, 0, 0) |
| uvs | Vector4 | (0, 0, 1, 1) |
| isVisible | boolean | true |
| alive | boolean | true |
| translateFromPivot | boolean | false |
| parentId | integer, | null |
| props | any | null |
There are also three properties you can read:
- idx - which allows you to read the index of the particle in the SPS particles array;
- idxInShape - which allows you to read the index of the particle relative to the shape (model mesh) added to the SPS;
- shapeId - a number reference to the model added.
For example, after
SPS.addShape(model1, 1000);SPS.addShape(model2, 500);
particle = SPS.particles[1200];
In the above example:
- the particle with particle.idx = 745 will have particle.idxInShape = 745 and particle.shapeId = 0.
- the particle with particle.idx = 1200 will have particle.idxInShape = 200 and particle.shapeId = 1.
These can be useful for applying different properties to different shapes.
When you set a particle rotation quaternion, its rotation property will then be ignored.
All positions are expressed in the SPS mesh's local space.
Please also note that even when a particle is invisible (isVisible set to false), its other property values can be updated, and updateParticle() is called for every particle whether it is visible or not.
Pivot
Setting the pivot vector value to a particle applies it as a translation to the particle in its local space. Any rotation is always computed around the local space origin. By default, the particle is translated, then rotated, then translated back to its original location unless you set the particle property translateFromPivot to true (default false). In this case, it's simply translated, then rotated and left at the translated location.
In the simple one-dimensional case, let a particle be at positionX with a pivot at pivotX. The center of transformation depends on whether translateFromPivot is true. When false, it is at the point positionX + pivotX, and when true, it is at the point positionX. The distance of the point from the pivot is then pivotX.
Illustration of a pivot particle with 1D pivot placement; change the data on lines 23 - 25 to see the effect.
Scaled Pivot ExamplePivot particle set in 3D, with rotation and scaling applied - 1000 tetrahedron satellites orbiting around 1000 rotating boxes.
Billboard
When you set your SPS in billboard mode, you should only set a rotation.z value. Setting SPS.billboard = true makes all the particles face the camera, and their x and y rotation values will be ignored. This is useful if you display only plane particles. However, if you work only with 2D particles, you should consider using the particle system or one of the various sprite managers, which are more performant for 2D computation. To display the SPS in billboard mode, you need to call SPS.setParticles() within the scene render loop.
Solid Particle Plane Billboard ModeHere is an example with plane particles in billboard mode.
Solid Plane Particles RotatingThe same but with plane particle rotations and no billboard mode.
Solid Box and Tetrahedron Particles RotatingThe same with solid particles, boxes and tetrahedrons.
Solid Particles With Colors and RotationsAnother one with colors and rotations.
Color
When you set a particle color, all vertices of the particle are set to that color and will blend nicely with any material colors, if applied.
On creation, the vertex colors of the particle are the vertex colors of the added model. When the model has vertices that use a range of colors, a box with different face colors, for example, these colors are preserved by the particle. However, setting the color of a particle results in a single color for that particle. When the model mesh has no colors, the particle color is set to white.
In initParticle and updateParticle you can use, for example
particle.color.r = red; //number from 0 to 1particle.color.g = green; //number from 0 to 1particle.color.b = blue; //number from 0 to 1particle.color.a = alpha; //number from 0 to 1Note: There is another way to set the initial state of the particles, which you will learn about on the next page about immutable SPS. This is done by using the positionFunction option property when adding a shape. When this method is used, particle colors are null, so a new Color4 object must be created to set particle.color, following this form:
import { Color4 } from "@babylonjs/core/Maths/math.color";particle.color = new Color4(0.25, 0.333, 0.67, 0.88);When you want to set an alpha value, do not forget to enable the alpha channel for vertex colors:
SPS.mesh.hasVertexAlpha = true;UVS
On the next page, we will look at how SPS can be configured to use multi-materials. For now, we consider the use of one material with one texture. The image file you use should contain all the textures you want to apply to the particles as a texture atlas.
To apply a texture from a region of the image file, you specify its lower-left (x, y) and upper-right (z, w) coordinates as fractions of the whole image in the form of a UV Vector4 (x, y, z, w). Taking the lower-left coordinates as (0, 0) and the upper left as (1, 1) will apply the whole image as a material. The uvs property of a particle is a Vector4, and for the whole image you would use a UV of (0, 0, 1, 1).
When you want to apply a smaller region given by lower left (0.2, 0.1) and upper right as (0.6, 0.3), you just set the uvs property like this:
particle.uvs.x = 0.2; //the coordinate of lower left corner given by 20% of image widthparticle.uvs.y = 0.1; //the coordinate of lower left corner given by 10% of image heightparticle.uvs.z = 0.6; //the coordinate of upper right corner given by 60% of image widthparticle.uvs.w = 0.3; //the coordinate of upper right corner given by 30% of image height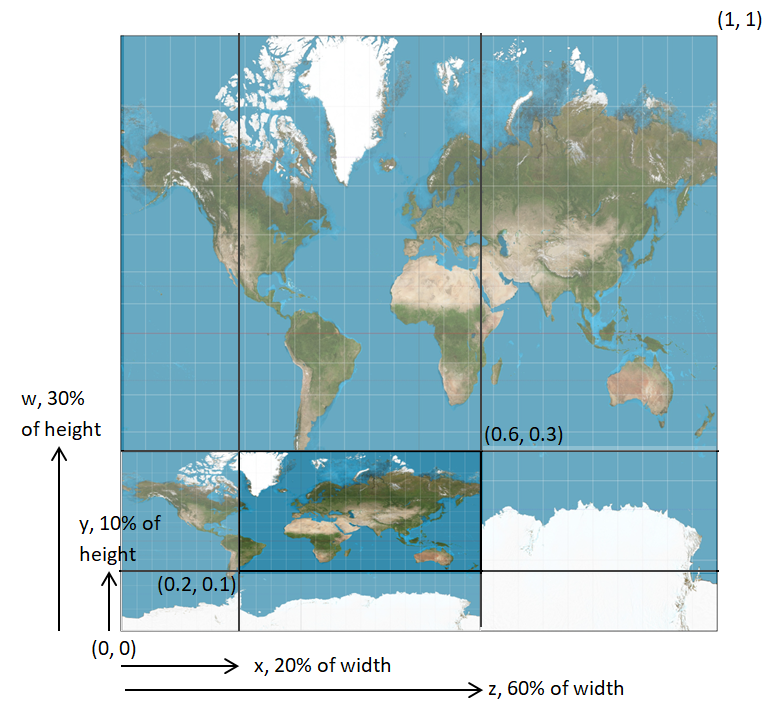
This can be used by either of the custom functions, positionFunction or updateParticle(), whichever you are using. It is most useful when the image is a texture atlas.
Solid Particles With UVs setEach particle has a different area of the texture set.
Face Material
When the model mesh you are adding to the SPS uses the material per face technique, the correct uv values are applied automatically when the model is added as a shape. Unlike colors, the model UVs are preserved whether or not the model had per-face UVs. This lets you use not only a texture atlas for the particles, but also a texture atlas for the model within the particle atlas, because you use only one final texture.
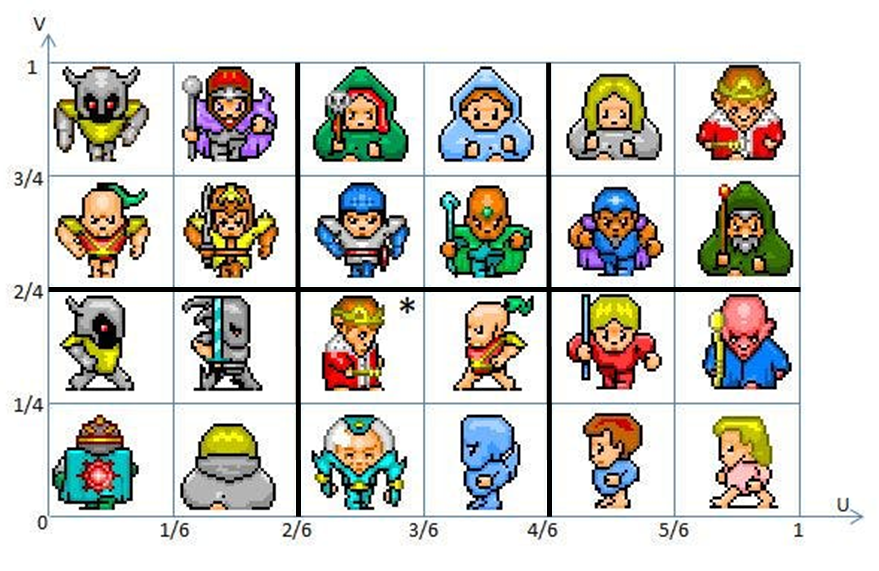
The model is a box with per-face material. Scaling the FaceUVs by 2 groups the 24 individual characters into 6 groups of 4. The particles' materials are direct copies of those of the model.
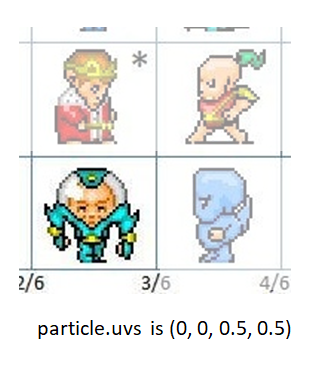
Solid Particles With Material Per Face With UVs ChangedThe model is a box with per-face material applied as before, with a group of four per face. An area of the texture for each face is then chosen using the particles' uvs, in this case by halving both the width and height for all particles as in the image below.
Transparency
Like any other mesh, you can also enable texture transparency with:
SPS.mesh.material.diffuseTexture.hasAlpha = true;Or even use the alpha channel of the texture image :
SPS.mesh.material.useAlphaFromDiffuseTexture = true;Color and UVs example.
Solid Particles With Textures and AlphaTexture with alpha.
Parenting
Each particle can be given another particle as a parent. The parent must be created before the current particle, which means it must have a lower index ID (particle.idx) than the current particle. So the first particle in the pool (idx = 0) cannot have a parent. To give a parent to a particle, just set its property .parentId to the parent index ID value.
if (particle.idx > 0) { particle.parentId = particle.idx - 1; // the previous particle becomes the parent of the current one}To un-parent a particle, just set .parentId back to null, the default value.
When a particle has a parent, its position and rotation are then expressed in its parent's local space.
In the following code, the previous particle becomes the parent of the current one. The particle position and rotation are expressed in the previous particle's space, which is already rotated and translated from the particle before it, and so on.
if (particle.idx > 0) { particle.parentId = particle.idx - 1; particle.rotation.z = 0.01; particle.position.x = 1.0;}A bluish box rotating around its pivot parented to a sliding red box.
Adding A Third BoxA third box is added to the last two, rotating about the previous one.
7 Box Parenting ChainA chain of 7 boxes each parented to the previous one.
Parenting Craziness2000 boxes parented per 20 segment stems.
Custom Properties
In JavaScript, you can obviously also create your own properties like acceleration: Vector3 or age, in initParticles() for instance.
SPS.initParticles = function () { for (let p = 0; p < SPS.nbParticles; p++) { particles[p].age = Math.random() * 20; }};Using TypeScript (or JavaScript), you can associate your own properties with each particle through the props property, typed any and set to null by default:
particle.props = { myProp1: val1, myProp2: val2 };Methods
To manage particle behavior, you use the mandatory method setParticles along with some non-mandatory custom functions. The setParticles method is necessary to update and display the mesh built by the SPS.
The non-mandatory custom functions are:
- initParticles() : lets you set all the initial particle properties. You must iterate over all the particles by using the SPS.nbParticles property.
- recycleParticle(particle) : lets you set a particle to be recycled. It is called per particle.
- updateParticle(particle) : lets you set the particle properties. This function is called per particle by SPS.setParticles().
- beforeUpdateParticles() : lets you make things within the call to SPS.setParticles() just before iterating over all the particles.
- afterUpdateParticles() : lets you make things within the call to SPS.setParticles() just after the iteration over all the particles is done.
The following pseudo-code shows how they are applied.
var particles: SolidParticles[] = [array of SolidParticle objects];function setParticles() { beforeUpdateParticles(); for (let p = 0; p < nbParticles; p++) { updateParticles(particles[p]); } updateTheWholeMesh(); afterUpdateParticles();}When needed, you would call recycleParticle(particle) in your own updateParticle(particle) function, for instance:
SPS.updateParticle = function (particle) { particle.velocity--; if (particle.velocity < 0) { particle.alive = false; SPS.recycleParticle(particle); // call to your own recycle function }};