Temporal Anti-Aliasing (TAA) Rendering Pipeline
Introduction
Aliasing is one of the most annoying problems when working with computer-generated images. It can spoil your experience, even when using the latest 3D rendering techniques. Aliasing appears in the form of jagged lines (geometric aliasing) or bright spots (specular/shading aliasing) and gets worse with movement.
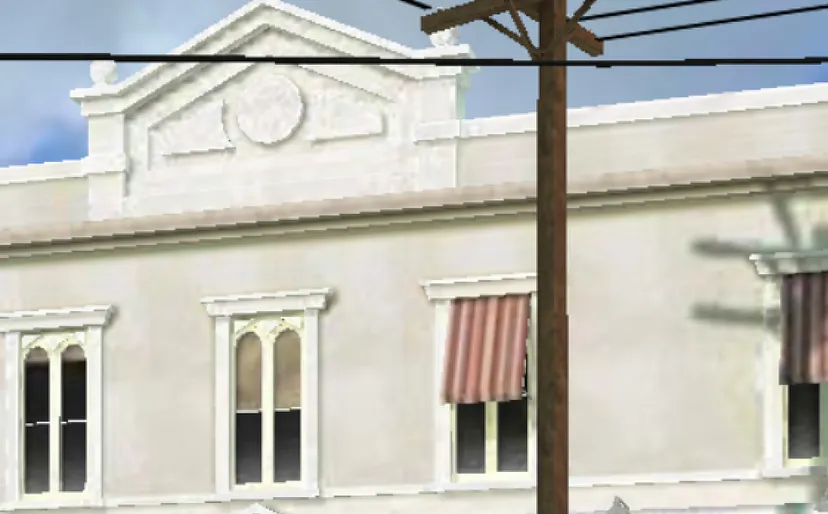 Geometric aliasing (look at all the mostly horizontal lines)
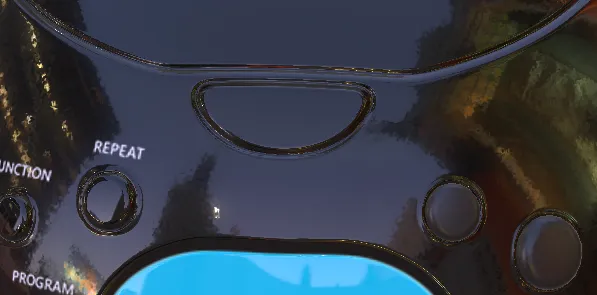 Shading aliasing (look at the bright spots around the buttons)
Aliasing exists because of the discrete nature of the screen (composed of pixels) and because each pixel can only be one color. Each pixel is effectively a small window on a part of the scene and should be able to display all the colors visible from that window to accurately describe the scene, but as it can only be one color, we have to make a decision about which color to display. There are many algorithms that deal with this problem, and Temporal Anti-Aliasing (TAA) is one of them.
TAA rendering pipeline
You can use TAA in your own programs thanks to the TAA rendering pipeline:
import { TAARenderingPipeline } from "@babylonjs/core/PostProcesses/RenderPipeline/Pipelines/taaRenderingPipeline";const taaRenderPipeline = new TAARenderingPipeline("taa", scene, [camera]);taaRenderPipeline.isEnabled = true;taaRenderPipeline.samples = 8;By default TAA will be disabled when moving the camera to reduce ghosting artifacts, but you’ll still get ghosting from moving objects in the scene. Read below if you want to understand why this happens or other options to get rid of ghosting.
This PG demonstrates it with the camera: TAA Rendering Pipeline Example
You can use two parameters with the rendering pipeline:
samples: Number of accumulated samples. The larger the value, the better the anti-aliasing, but the longer it takes to converge.factor: The factor used to blend the history image with the current image.
See below for further explanations of samples and factor if you’d like to know more about our implementation.
Temporal Anti-Aliasing general principles
The main idea is quite simple: render the scene several times, each time with a different (small) offset for the projection matrix so that the rendered scene is slightly offset within the one-pixel limit. By averaging all the renderings, you’ll obtain a pretty good anti-aliasing effect.
 Jittering the camera — from Unigine documentation
However, rendering the scene several times per frame would seriously affect performance. This is where the “temporal” part of TAA comes in: we render the scene once per frame (with a different offset each time), and average the result over several consecutive frames. In this way, the cost of calculation is spread over several frames. It will take some time to obtain a smoothed image (8 frames, for example, if we choose 8 different offsets), but if we work at 60 frames per second, it won’t be too noticeable. Let’s see how this works in practice.
Jitter offset
The rendered geometry needs to be "jittered" slightly so that the scene is slightly different from one frame to the next, but still within the dimensions of one pixel.
What we need to do to jitter the geometry is apply a 2D offset jitter to the 4D vertex position (the 4th "dimension" being w):
position.xy += jitter * position.w;We multiply the jitter by w, but don’t forget that the GPU will perform a division by the w coordinate as part of the normal rendering pipeline, to convert clip space to NDC (Normalized Device Coordinate) space! By multiplying by w, we cancel out the division by w and we’ll get what we want, a jitter shift of the 2D coordinates.
Note that the coordinates to which jitter is applied are in NDC space, which is in the interval [-1,1] for x/y. So, if the jitter offsets are in the interval [0,1], they must be multiplied by (2/width, 2/height), where width and height are the dimensions of the output (usually the screen), if the offsets are not to exceed the one-pixel limit.
On the JavaScript side, it’s easy enough: just define the offsets in the uniform as follows:
uniforms.setFloat2("jitter", dx * 2 / width, dy * 2 / height);In the real code, we’ll apply a translation (-0.5, -0.5) to (dx,dy) because the 2D pixel coordinate is the pixel center coordinate.
Generating the offsets
We could use random values for the offsets, but we can get better results by using a low-discrepancy sequence. I won’t go into the details; you’ll find plenty of documentation on the subject on the Internet if you’re interested. The generally accepted method for TAA is to use a Halton sequence. The code to generate this sequence can also be easily found, and we implemented our own version, which you can use for your own purposes if you wish.
As an illustration, here are the locations of 8 points generated with a Halton sequence created from the starting numbers (2,3):
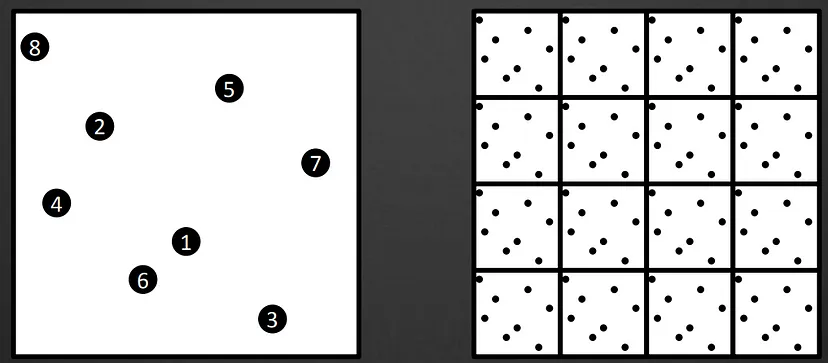 From High Quality Temporal Supersampling by Brian Karis (Unreal Engine)
Note that when we’ve used all the points from the Halton sequence for our projection offsets, we restart from the first point.
Averaging the frames
What we could do is accumulate (“additive blending”) each frame into a render target, then divide by the number of frames to get the final average. To avoid division, we could apply a weight to the color before writing it to the output. For example, if we use a sequence of 8 Halton samples, we’d use a weight of 1/8 for each frame. However, this method is a bit cumbersome, we’d have to clear the render target before restarting the Halton sequence, and it’s not well suited to handling motion. In addition, blending is more demanding in terms of performance, as it requires the source target to be read during the process.
Instead, we perform a moving average using this formula (it can be shown that this formula converges to the mean of x(t) values when α is small — see slides 15 and 16 of High Quality Temporal Supersampling):
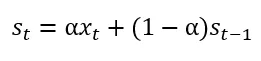
s(t-1) is the current average of a given pixel, x(t) is the new color of the pixel in the current frame, and s(t) is the new average. α is a small number, to be chosen by the user. A larger number will make the formula converge faster, but towards a number that will deviate more from the true mean than if a smaller value is chosen, but in this case, it will converge more slowly… Generally, a value in the [0.05, 0.1] range will give good results.
We used a rendering pipeline to implement this averaging, and a ping-pong of two render targets: one render target is used as the source (s(t-1)) and the other stores the result of the calculation for the current frame (s(t)). The render targets are exchanged at the end of the calculation in order to swap their roles for the next frame.
Anti-ghosting techniques
One of the shortcomings of TAA is an artifact known as "ghosting" which is caused by moving the camera or objects:
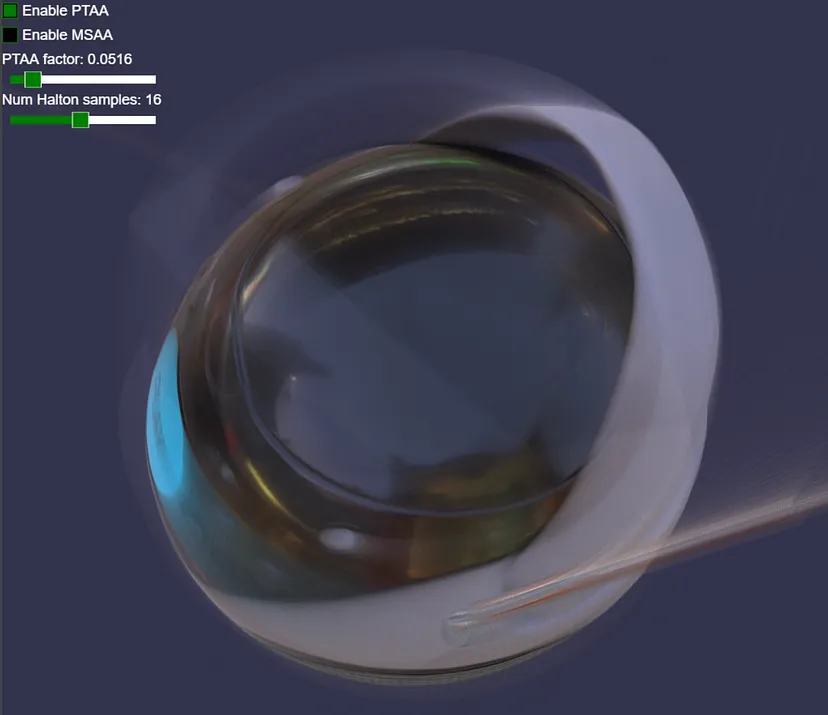
This is because in the formula :
s(t-1) should not be the accumulation for the pixel we’re currently processing, but rather we should find out where this pixel was located in the previous image to obtain the accumulation for this pixel! And therein lies the complexity. Luckily, Babylon provides a few options to get rid of this artifact!
Disable on camera move
taaRenderingPipeline.disableOnCameraMove = true;This is the default and cheapest solution. All this does is disable the TAA effect whenever the camera is moving.
This works well when the only movement in your scene is from your camera, but does not prevent ghosting when the objects themselves are moving. For example if there’s an animation it will experience the same ghosting regardless of this option:
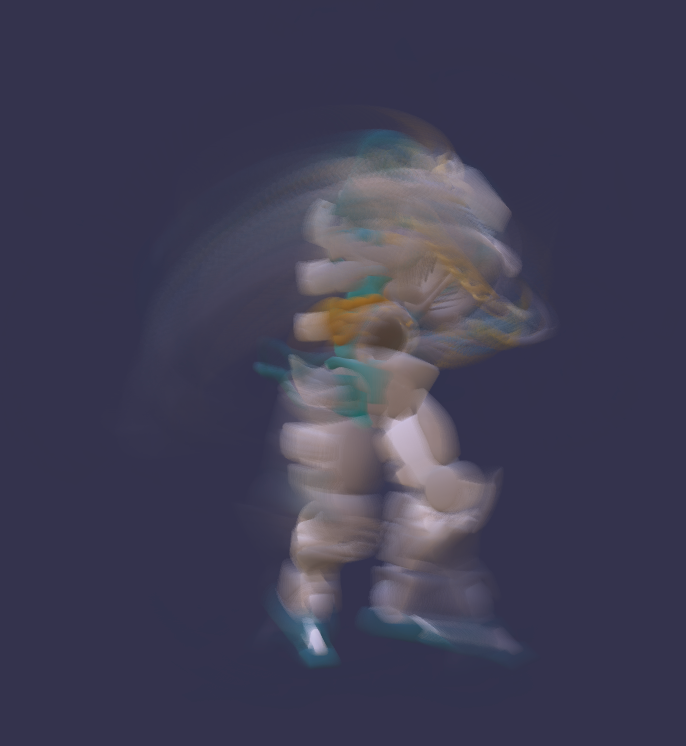
Note that you’ll likely want to set this to false if you’re using any of the other techniques below. You can still leave this set to true if you wish to use the other techniques for moving objects while still disabling TAA for a moving camera.
Reproject history
taaRenderingPipeline.reprojectHistory = true;Enabling this will attempt to reproject the accumulated history based on a per-pixel velocity. This helps reduce the ghosting for both moving cameras and objects by more accurately locating the pixel’s location in the previous frame.
For this to work the TAA implementation requires a texture containing the per-pixel velocity, which can be generated alongside the color output. However, this won’t work on hardware that doesn’t support multiple render targets, or for materials that don’t write to the velocity buffer.
Additionally, this still produces ghosting when a pixel goes from being covered by an object in one frame to uncovered in the next. This occurs because the pixel is not in the previous frame, but it still tries to find its location in the previous frame regardless:
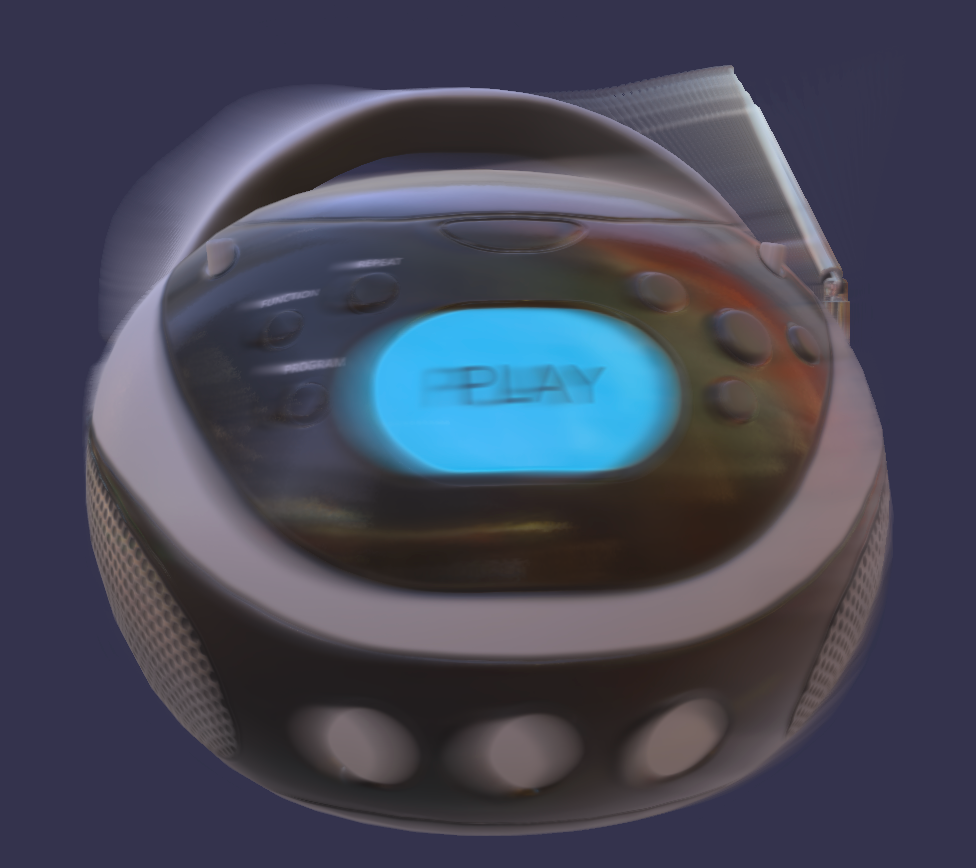
Note how the front of the model is less blurry than the background behind the model.
For this reason, it is recommended to combine this with clampHistory, which brings us to the next option...
Clamp history
taaRenderingPipeline.clampHistory = true;In theory, if a pixel is too different from its previous value, then the previous value is likely to be incorrect (or reprojected incorrectly). In this case, the previous value is tweaked to better match what it (again, in theory) "should" be based on a neighborhood of pixels. There are multiple ways to do this, but one of the common ones is color clamping, which is what this option does.
Color clamping starts by getting the min and max values from the neighborhood of pixels, which we define as the 3x3 square centered on the target location:
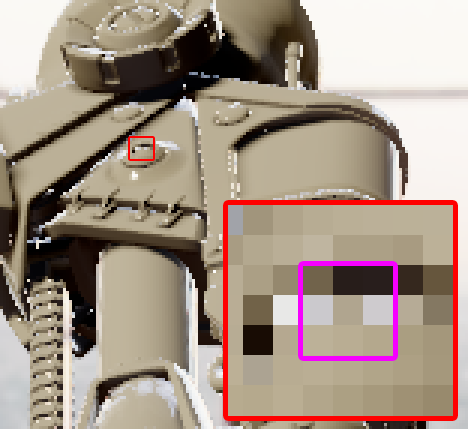 From Temporal AA and the Quest for the Holy Trail by Emilio López
Color clamping then assumes that the pixel will never go outside the [min, max] range and anything outside that range is likely to be incorrect. These "incorrect" pixels are adjusted by clamping them to within this [min, max] range, hence where the name comes from.
Due to its aggressive nature, this technique almost entirely gets rid of ghosting artifacts at the cost of being slightly more expensive (each output pixel now requires querying 9 more input pixels). That being said, movement still produces artifacts with this technique, albeit a different kind that’s a lot more subtle:
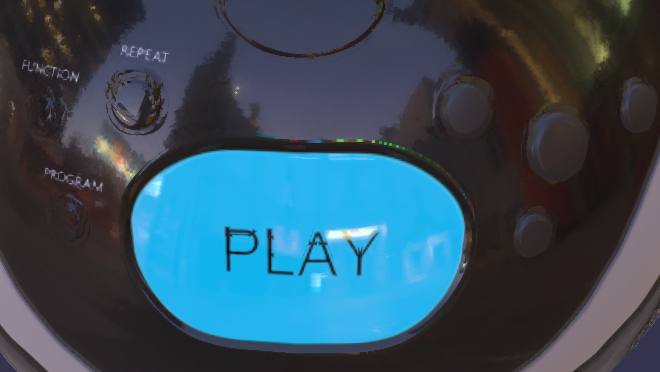
Note the slightly garbled text and edges. Sadly, an incorrect value is still an incorrect value, regardless of how much you try to "correct" it.
For the best results in motion it is recommended to enable both reprojectHistory, which will attempt to find the pixel in the previous frame, and clampHistory, which acts as a fallback if the reprojection does not work:
import { TAARenderingPipeline } from "@babylonjs/core/PostProcesses/RenderPipeline/Pipelines/taaRenderingPipeline";const taaRenderPipeline = new TAARenderingPipeline("taa", scene, [camera]);taaRenderPipeline.reprojectHistory = true;taaRenderPipeline.clampHistory = true;// Camera motion is handled by reprojection and clampingtaaRenderPipeline.disableOnCameraMove = false;Further reading
- https://de45xmedrsdbp.cloudfront.net/Resources/files/TemporalAA_small-59732822.pdf
- https://bartwronski.com/2014/03/15/temporal-supersampling-and-antialiasing/
- https://advances.realtimerendering.com/s2016/s16_Ke.pptx
- https://www.elopezr.com/temporal-aa-and-the-quest-for-the-holy-trail/
- https://sugulee.wordpress.com/2021/06/21/temporal-anti-aliasingtaa-tutorial/