Visualizing Mesh Data
The MeshDebugPluginMaterial
Visualizing certain properties of a mesh can often be tricky. The MeshDebugPluginMaterial, one of the material plugins available in the Babylon library, can be used to aid in debugging these properties.
The plugin currently offers 7 modes, which are detailed below.
Triangles Mode
The TRIANGLES visualization of the MeshDebugPluginMaterial allows you to see the underlying mesh's wireframe.
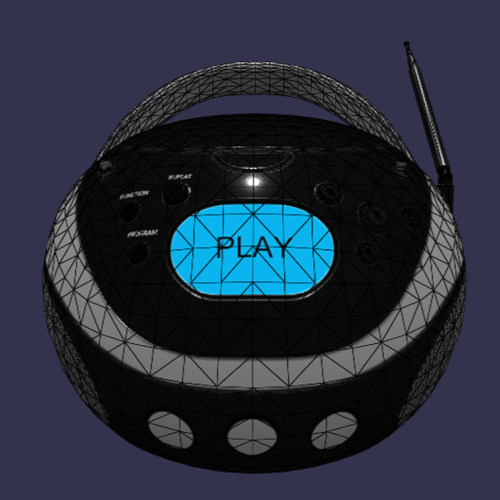
How To Use
Before applying the plugin, first call the static function PrepareMeshForTrianglesAndVerticesMode on the mesh. Then create the MeshDebugPluginMaterial with the mode option set to MeshDebugMode.TRIANGLES.
You can customize the wireframe's thickness and color with the options below
wireframeTrianglesColor: (Color3) the color of the wireframewireframeThickness: (number) the thickness of the wireframe's edges
Example
import { MeshDebugMode, MeshDebugPluginMaterial } from "@babylonjs/core/Materials/meshDebugPluginMaterial";import { Color3 } from "@babylonjs/core/Maths/math.color";MeshDebugPluginMaterial.PrepareMeshForTrianglesAndVerticesMode(mesh);new MeshDebugPluginMaterial(mesh.material, { mode: MeshDebugMode.TRIANGLES, wireframeTrianglesColor: new Color3(0, 0, 0), wireframeThickness: 0.7});NOTE Behind-the-scenes, PrepareMeshForTrianglesAndVerticesMode triples the number of triangles and creates number_triangles*2*3 vertices in the mesh's vertex buffers. This is necessary for the plugin's shaders to work correctly. You can undo these changes to the mesh via the rollback function returned by the method.
Vertices Mode
The plugin's VERTICES mode draws dots over all vertices of the mesh, as shown below.
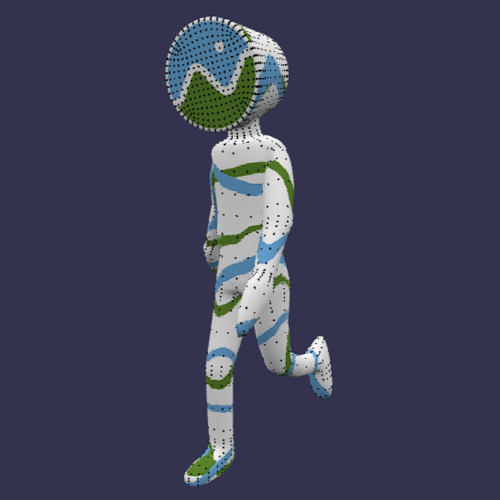
How To Use
This mode works similarly to TRIANGLES. Call the static function PrepareMeshForTrianglesAndVerticesMode on the mesh first, then apply the plugin.
Customization options include
vertexColor: (Color3) the color of the vertex dotsvertexRadius: (number) the radius of the vertex dots
Example
import { MeshDebugMode, MeshDebugPluginMaterial } from "@babylonjs/core/Materials/meshDebugPluginMaterial";import { Color3 } from "@babylonjs/core/Maths/math.color";MeshDebugPluginMaterial.PrepareMeshForTrianglesAndVerticesMode(mesh);new MeshDebugPluginMaterial(mesh.material, { mode: MeshDebugMode.TRIANGLES, vertexColor: new Color3(0, 0, 0), vertexRadius: 1.2});Triangles-Vertices Mode
If you'd like to see both the mesh's wireframe and vertex dots, use the TRIANGLES_VERTICES mode of the plugin.
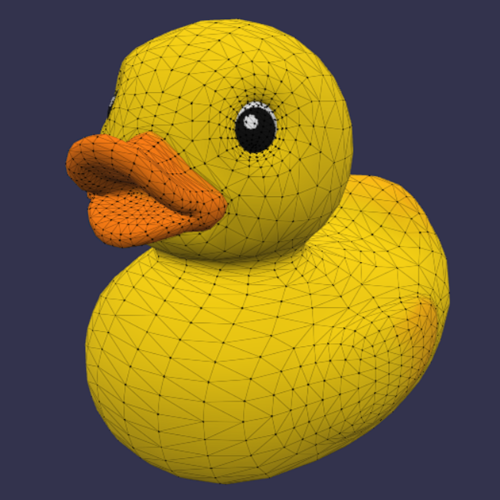
How To Use
Just like both TRIANGLES and VERTICES modes, use PrepareMeshForTrianglesAndVerticesMode on the mesh, then apply the plugin.
The same options available to TRIANGLES and VERTICES modes also apply to TRIANGLES_VERTICES, with one exception. Below, note that wireframeTrianglesColor is replaced by wireframeVerticesColor.
vertexColor: (Color3) the color of the vertex dotsvertexRadius: (number) the radius of the vertex dotswireframeVerticesColor: (Color3) the color of the wireframewireframeThickness: (number) the thickness of the wireframe's edges in screen space
Example
import { MeshDebugMode, MeshDebugPluginMaterial } from "@babylonjs/core/Materials/meshDebugPluginMaterial";import { Color3 } from "@babylonjs/core/Maths/math.color";MeshDebugPluginMaterial.PrepareMeshForTrianglesAndVerticesMode(mesh);new MeshDebugPluginMaterial(mesh.material, { mode: MeshDebugMode.TRIANGLES_VERTICES, wireframeVerticesColor: new Color3(0.8, 0.8, 0.8), wireframeThickness: 0.7, vertexColor: new Color3(0, 0, 0), vertexRadius: 1.2});UV0 and UV1 Modes
These modes can help visualize a mesh's UVs with a basic checkerboard grid.
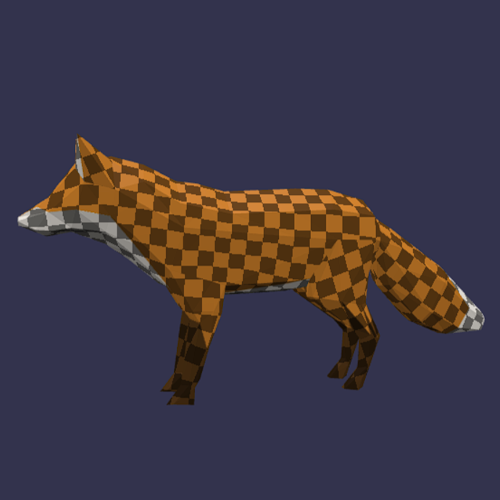
How To Use
Simply set the plugin mode to UV0 or UV1, depending on which UV set you'd like to see.
You can customize the primary and secondary color of the checkerboard grid via
uvPrimaryColor: (Color3) the first color used in the checkerboard griduvSecondaryColor: (Color3) the second color used in the checkerboard griduvScale: (number) the number of squares along one axis of the grid
Example
import { MeshDebugMode, MeshDebugPluginMaterial } from "@babylonjs/core/Materials/meshDebugPluginMaterial";import { Color3 } from "@babylonjs/core/Maths/math.color";new MeshDebugPluginMaterial(mesh.material, { mode: MeshDebugMode.UV0, uvPrimaryColor: new Color3(1, 1, 1), uvSecondaryColor: new Color3(0.5, 0.5, 0.5), uvScale: 20});Vertex Colors Mode
The VERTEXCOLORS mode can be used to better see a mesh's vertex colors.
How To Use
Set the plugin's mode to VERTEXCOLORS. For best results, also set the multiply option to false.
Example
import { MeshDebugMode, MeshDebugPluginMaterial } from "@babylonjs/core/Materials/meshDebugPluginMaterial";new MeshDebugPluginMaterial(mesh.material, { mode: MeshDebugMode.VERTEXCOLORS, multiply: false});NOTE By default, the plugin multiplies the mode's color against the material's final color underneath. We should disable this behavior here to get the real color of each vertex.
NOTE Under-the-hood, disabling multiply when on VERTEXCOLORS mode will also disable lighting effects on the model. See The multiply option section for more details.
Material IDs Mode
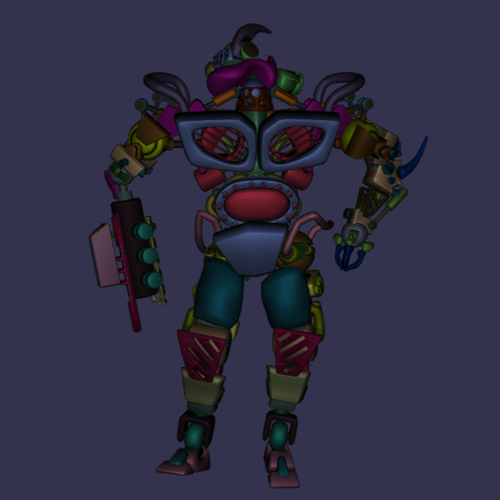
The MATERIALIDS mode provides a visual way of distinguishing different materials from one another.
How To Use
Set the plugin's mode to MATERIALIDS across all materials. You may also want to toggle off the multiply option to better see the ID colors.
The MeshDebugPluginMaterial comes with a default color palette for MATERIALIDS. To use a custom color palette, you can directly replace the plugin's static palette with your own before applying the plugin, as in the following snippet.
Example
import { MeshDebugMode, MeshDebugPluginMaterial } from "@babylonjs/core/Materials/meshDebugPluginMaterial";import { Color3 } from "@babylonjs/core/Maths/math.color";MeshDebugPluginMaterial.Reset();MeshDebugPluginMaterial.MaterialColors = [ new Color3(1, 0, 0), new Color3(0, 1, 0), new Color3(0, 0, 1)];new MeshDebugPluginMaterial(mesh.material, { mode: MeshDebugMode.MATERIALIDS, multiply: false});NOTE If you'd like ID colors to be consistent across runs, call the static function MeshDebugPluginMaterial.Reset() before applying the modes. This resets all static variables of the MeshDebugPluginMaterial class, including the counting mechanism for material IDs.
Playground example: Material IDs
The Multiply Option
The MeshDebugPluginMaterial features an option, multiply, that determines if the plugin's visualization colors should be multiplied against the material's final color. This option is set to true by default, but what happens if you set it to false?
If set to false, the plugin will replace the material's final color with its own, built-in visual (unless the plugin is in VERTEXCOLORS). This default shading looks as follows:
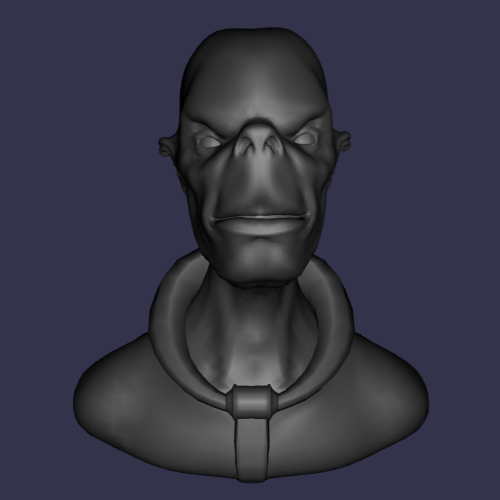
The visual is based on a Phong lighting model and treats the active camera as a light source. You can customize the default shading's appearance with a few options.
shadedDiffuseColor: (Color3) the diffuse color of the default shadingshadedSpecularColor: (Color3) the specular color of the default shadingshadedSpecularPower: (number) the strength of the default shading's specularity
Example
import { MeshDebugPluginMaterial } from "@babylonjs/core/Materials/meshDebugPluginMaterial";import { Color3 } from "@babylonjs/core/Maths/math.color";new MeshDebugPluginMaterial(mesh.material, { mode: // any mode multiply: false, shadedDiffuseColor: new Color3(1, 1, 1), shadedSpecularColor: new Color3(.8, .8, .8), shadedSpecularPower: 10});See the difference: Default Shading
Notes on Usage
The mesh must have a material assigned to it in order for the MeshDebugPluginMaterial to work as expected. You might consider adding logic to your program that assigns new PBRMaterials to meshes without any material.
Also, all material plugins must be added to materials before they are used for rendering. There are a few techniques to do this, including:
- Importing the mesh asynchronously, then adding the plugin to the materials of the result
- Using an observable like
scene.onNewMaterialAddedObservable - Using an
AssetContainerto modify the materials before adding them to the scene - Creating a new material, applying the plugin to the new material, then assigning the new material to the mesh
API
See the full list of available properties, options, methods, and more here.