Decals
What are Decals for
These are usually used to add details to meshes (bullet holes, local details, etc.). A decal is either a mesh produced from a subset of a previous one with a small offset in order to appear on top of it, or an additional texture applied to a mesh (a "decal map").
Mesh Decals
Creation Example :
import { MeshBuilder } from "@babylonjs/core/Meshes/meshBuilder";const decal = MeshBuilder.CreateDecal("decal", mesh, { position: myPos }, scene);Don't forget the mesh parameter; this is the mesh to which the decal is applied.
Properties, all optional :
| property | value | default value |
|---|---|---|
| position | (Vector3) position of the decal (World coordinates) | (0, 0, 0) |
| normal | (Vector3) the normal of the mesh where the decal is applied onto (World coordinates) | Vector3.Up |
| size | (Vector3) the x, y, z sizes of the decal | (1, 1, 1) |
| angle | (number) the angle to rotate the decal | 0 |
Simple Example of Decals click on the cat.
Starting with v5.28.0, decals can be created for rigged meshes and two new options are available:
| property | value | default value |
|---|---|---|
| localMode | defines that the computations should be done with the local mesh coordinates instead of the world space coordinates. Use this mode if you want the decal to be parented to the source mesh and move/rotate with it. | false |
| defines if the back faces should be removed from the decal mesh | false |
Note that localMode=true is automatically enforced for rigged meshes (when sourceMesh.skeleton !== null); otherwise, it would not work. Also, you should probably always set localMode to true even for non-rigged meshes, as it allows your decal to follow the source mesh even if the mesh moves or rotates.
The cullBackFaces option set to true will make sure the faces that are back facing the direction of projection (the inverse direction of the normal option) won't be created. It can help you avoid leaking a texture in the back of an object if your decal size is too big in the z dimension (size.z).
For example:
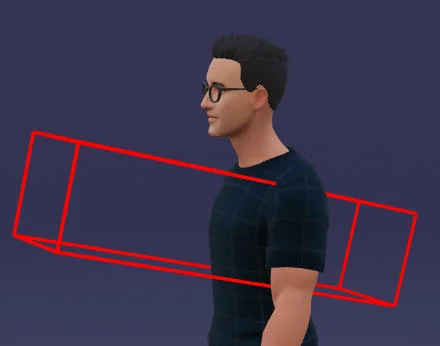
In this picture, the red box represents the projection box and has the size dimensions passed in options.
As the projection box extends past the back, the projected texture will be visible there when cullBackFaces=false:
| front | back |
|---|---|
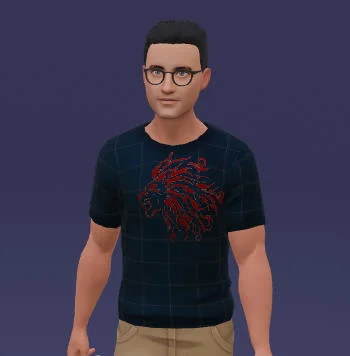 | 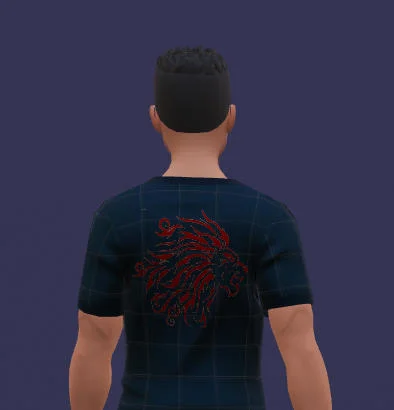 |
With cullBackFaces=true, however, the projected texture will not be visible on the back:
| front | back |
|---|---|
| 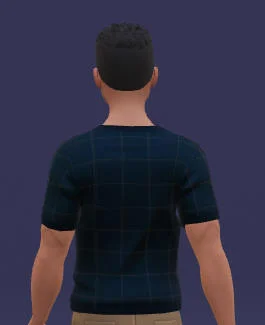 |
Of course, you can try to lower the dimensions of the projection box:
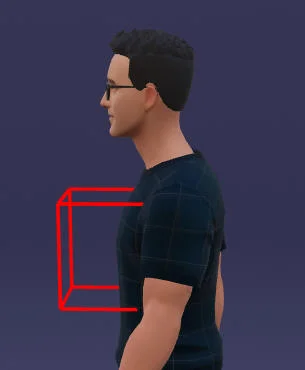
It will work even with cullBackFaces=false as the box does not extend past the back. But even this reduced box is too big if we want to create a decal on the arm, for example. For the arm, you would need a very tiny box, but then this tiny box may be too tiny if we project on another part of the body... So, you would need to adjust the size depending on where you create the decal, which can be tedious and difficult to achieve in practice. Using cullBackFaces=true with a relatively big box will work in all cases without worrying about where the decal is created.
You can use this PG to experiment with decals: Decals with rigged and moving meshes
You can move over the dude / cube / mesh and left click to create a permanent decal. The "Cull back faces of decal" checkbox lets you experiment with the cullBackFaces option.
Note that the decal is created with localMode=true, that's why it works as expected for the sphere and the box (the decal will follow the rotation/movement of the mesh).
Texture Decals (or Decal Maps)
Decal Maps are new in Babylon.js since 5.49.0. They are a way to add a decal to a mesh without creating a new mesh. A Decal Map is a texture applied to a mesh so that it appears to be a decal on the mesh.
The advantage of Decal Maps over Mesh Decals is that they are much faster to create and render. They can also be applied to meshes with morph targets or any other custom vertex deformation, which is not the case with Mesh Decals. The main drawback is that you need an additional texture for each mesh you want to apply a decal map to. Other limitations are:
- If your mesh has large extensions, you may need to use large decal textures to get enough detail for the decals.
- You cannot selectively remove some decals and not others in a decal texture: you can either remove them all (by deleting the decal texture or turning off the effect in the mesh), or none.
- The texture coordinates of the mesh must be unique, which means that each triangle in the mesh must correspond to a different texture area.
- Mipmaps are generally necessary to limit aliasing problems. If you often update a large number of decal textures, this can have a substantial impact on performance.
Decal Maps have two aspects: creating the texture/adding decals, and applying the texture to a mesh.
Note: Decal Maps are only supported for standard and PBR materials!
Creating the Decal Map
There is a new class called MeshUVSpaceRenderer which can be used to create and update a decal map. The main method is renderTexture, which allows you to add a decal to the texture:
import { Texture } from "@babylonjs/core/Materials/Textures/texture";import { Vector3 } from "@babylonjs/core/Maths/math.vector";import { MeshUVSpaceRenderer } from "@babylonjs/core/Meshes/meshUVSpaceRenderer";const decalMap = new MeshUVSpaceRenderer(mesh, scene);const texture = new Texture("bullet.png", scene);const decalSize = new Vector3(1, 1, 1);// find the position and the normal of the mesh where you want to add the decal...decalMap.renderTexture(texture, position, normal, decalSize) ;Whenever you need to add a new decal to the map, just call renderTexture. This is much faster than creating a new mesh decal and you can do it several times per frame without any problem (think "machine gun burst").
Rendering a mesh with a decal map
Once you have created the decal map, you can apply it to a mesh using the decalMap property of the mesh and enable support for the decal map in the material:
mesh.decalMap = decalMap;mesh.material.decalMap.isEnabled = true;Note that you must enable support for decal maps (material.decalMap.isEnabled = true) before rendering with the material! This is because a material plugin must be added to a material before the first rendering, and decal map is implemented by the material plugin mechanism.
However, you can disable/enable the decal map rendering at any time by updating decalMap.isEnabled. You can even start in a disabled state and enable it later, but the important thing is to set a value to material.decalMap.isEnabled (or even just access material.decalMap) before the first rendering. If you don't do this, material.decalMap will always return null.
Here are sample playgrounds that show how to use decal maps. Click on the meshes to add decals:
Improving results
Sometimes you may see artifacts when you add a decal to a texture.
This is because the mesh onto which you're projecting the decal has different UV islands, and artifacts appear when the decal crosses several islands.
As of version 6.33.1, you can solve the problem by passing the uvEdgeBlending: true option when creating the MeshUVSpaceRenderer instance:
import { MeshUVSpaceRenderer } from "@babylonjs/core/Meshes/meshUVSpaceRenderer";const decalMap = new MeshUVSpaceRenderer(mesh, scene, { uvEdgeBlending: true });Results:
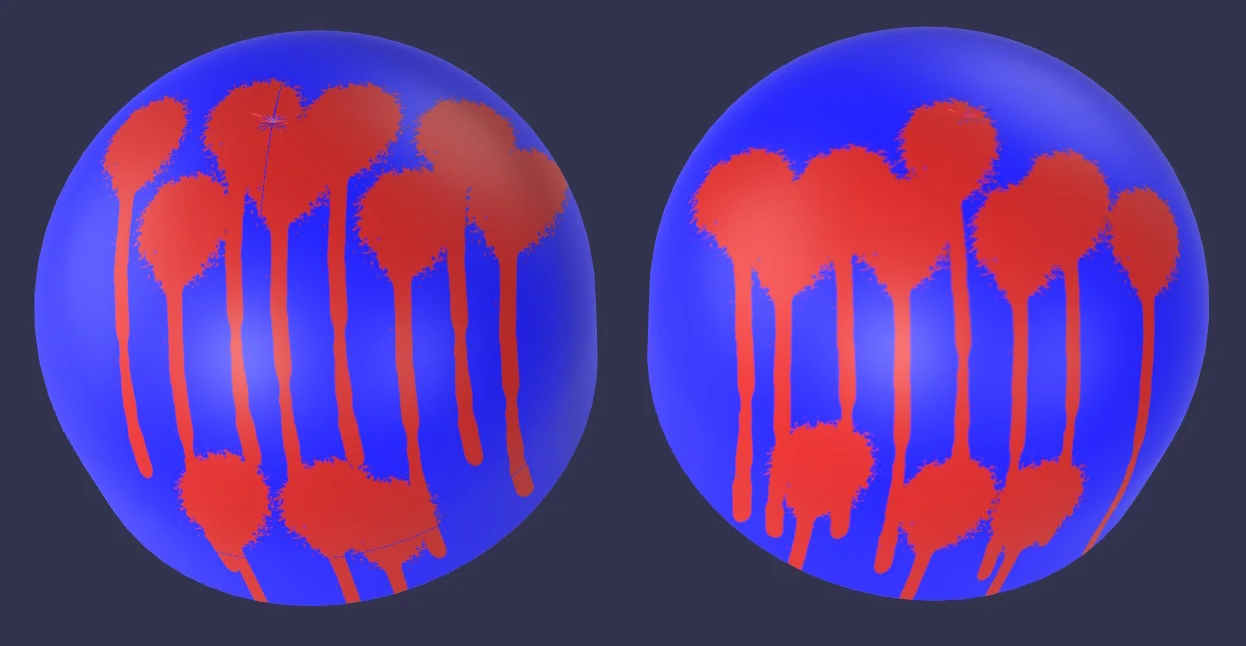
The mesh on the right has uvEdgeBlending = true but the mesh on the left does not.
Note that this option requires additional GPU processing, so it's a compromise between better visuals and better performance.
Using Decal Maps with ES6 and Tree Shaking
Decal maps are an optional feature that is not supported by default by the standard and PBR materials, to avoid an increase in code size if you do not use it. To enable support when using ES6 and Tree Shaking, see Babylon.js ES6 support with Tree Shaking.
In ES6 with Tree Shaking, another way to enable decal map support without having to update each material individually is to globally enable decal map plugin injection in all materials:
import { DecalMapConfiguration } from "@babylonjs/core/Materials/material.decalMapConfiguration";import { RegisterMaterialPlugin } from "@babylonjs/core/Materials/materialPluginManager";RegisterMaterialPlugin("DecalMap", (material) => { material.decalMap = new DecalMapConfiguration(material); material.decalMap.isEnabled = true; return material.decalMap;});If you do this, you should import the file Meshes/abstractMesh.decalMap and not Materials/material.decalMap!