# Creating New Blocks
> Learn how to get started with Smart Filters
Source: https://doc.babylonjs.com/features/featuresDeepDive/smartFilters/creatingNewBlocks
## Overview
There are two ways you can create and use blocks for Smart Filters:
1. With annotated GLSL code
1. With TypeScript + GLSL code
| | Annotated GLSL | TS + GLSL |
| ----------------------------------------------------------------------------------------------------------- | -------------- | --------- |
| Can use block in your own project | Yes | Yes |
| Can contribute block to @babylonjs/smart-filters-blocks | Yes | Yes |
| Can load directly in the Smart Filters Editor (SFE) | Yes | No |
| Can do custom logic in your bind function
(e.g. math or packing multiple inputs into a single uniform) | No | Yes |
## Designing Your Block
### Terminology
| Term | Definition |
| ----------- | -------------------------------------------------------------------------------------------------------------------------------------------------------------------------------------------------------------------------------------------------------- |
| Design Time | When you are instantiating blocks, connecting them, and setting initial values of properties and input blocks |
| Runtime | Begins after you have called createRuntimeAsync() and are working with the SmartFilterRuntime returned - at this point input block values can be changed, but changes to block properties will have no effect on that instance of the SmartFilterRuntime |
### Uniforms vs. Consts
In a Smart Filter block, input connection points become uniforms, and properties of the block become consts.
| Pick | When |
| ------- | ---------------------------------------------------------------------------------------------------------------------------------------------------------------------------------- |
| Uniform | If the value needs to be settable at runtime (for example, to achieve an animation) |
| Const | If the value will never need to be changed at runtime. The benefit of a const is that the shader compiler can better optimize the code since it knows the value will never change. |
## Important GLSL Coding Requirements
> [!NOTE]
> Regardless of which approach you use for building your blocks, you need to make sure that the GLSL code for the block follows these requirements so that it is compatible with the Smart Filter optimizer.
These requirements ensure the optimizer can collapse sections of the Smart Filter into a single draw call while minimizing code size and ensuring correctness:
1. Helper functions (any function in the fragment shader other than the main function) must not directly access uniforms
- Instead, pass uniform values into the helper function
- Note: Helper functions may access const and define values
1. Only read from textures in the main function, do not pass a sampler2D into a helper function for it to read from
1. Reduce the texture2D() calls when possible
- For example, instead of:
```GLSL
if (mode == 1.) {
color = texture2D(input, vUV);
} else {
color = texture2D(input, 1 - vUV);
}
```
- do this:
```GLSL
if (mode == 1.) {
uvToUse = vUV;
} else {
uvToUse = 1 - vUV;
}
color = texture2D(input, uvToUse);
```
1. Be sure your fragment shaders return values in the 0-1 range
- Why: You can't rely on intermediate textures for clamping your values, because when your block is included in a Smart Filter and run through the optimizer, it
will return its value directly to the next block in the Smart Filter instead of writing to an intermediate texture.
- Debugging tip: If you see visual differences in the Smart Filter Editor when testing a Smart Filter and toggling the optimizer on and off, you can enable the "Clamp Return Values" debug mode (directly below the Optimize Smart Filter toggle) to have it inject clamps for you when it connects blocks. If that removes the inconsistency when toggling the optimizer on and off, that indicates you have a block that needs to clamp its output to be compatible with the optimizer.
### Testing Optimizer Compatibility
If you use the Annotated GLSL Code method, you can easily test that your block is optimizer-compatible by adding it to a Smart Filter in the Smart Filter Editor and then turning on the "Optimize Smart Filter" toggle in the Options pane on the right. Any errors will be displayed in the console at the bottom. See the following sections for more details.
## Using Annotated GLSL Code
This approach doesn't support custom vertex shaders or custom binding logic, but is the easiest to get started with and you can load these blocks directly into the [Smart Filters Editor](https://sfe.babylonjs.com).
### Naming Convention
The Smart Filters core comes with a build tool to convert these annotated GLSL files into TypeScript classes. If you plan to use your block in a package, such as @babylonjs/smart-filters-blocks, or in your own project that will use these tools, you should follow this naming convention:
`blackAndWhiteBlock.block.glsl`
### Getting Started
The easiest way to create a custom block using annotated GLSL code is to:
1. Author the file in the editor of your choice
1. Open the [Smart Filters Editor](https://sfe.babylonjs.com)
1. Click "Add" under "Custom Blocks" then select your GLSL file
1. Watch the console UI at the bottom of the editor for any errors
1. Drag your block into the Smart Filter and wire it up
1. To see changes, just modify your GLSL file, click "Add" under "Custom Blocks" again, and select it
- Your new block definition will be loaded and the current Smart Filter rebuilt, so you'll see your changes immediately
### Sample
```annotated-GLSL
// { "smartFilterBlockType": "SerializedTintBlock" }
uniform sampler2D input;
// { "default": { "r": 1, "g": 0, "b": 0 } }
uniform vec3 tint;
// { "default": 0.25 }
uniform float amount;
vec4 mainImage(vec2 vUV) { // main
vec4 color = texture2D(input, vUV);
vec3 tinted = mix(color.rgb, tint, amount);
return vec4(tinted, color.a);
}
```
### Creating Block Properties
Block properties are consts in the GLSL. If you want to introduce a block property (which unlike a uniform can only be set before the runtime is created), you can add an annotation directly above the const declaration like this:
```annotated-GLSL
// { "property": true }
const float mode = 1.;
```
When the block is selected in the Smart Filters Editor, you'll see the mode appear in the properties panel on the right:
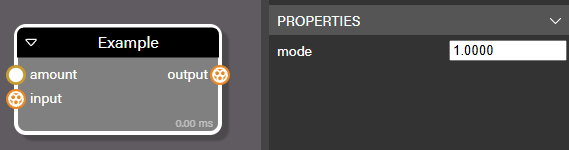
You can optionally supply a list of values to appear in a dropdown like this:
```annotated-GLSL
// { "property": { "options": { "Normal": 0, "Crazy": 1, "Odd": 2 } } }
const float mode = 1.;
```
And it will appear like this in the Smart Filters Editor:
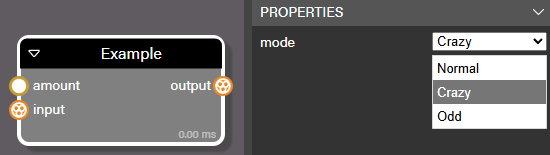
### Annotation Requirements
1. The file must start with a // comment containing a serialized JSON object of type `GlslHeader`
- The smartFilterBlockType property is required
- See [shaderConverter.ts](https://github.com/BabylonJS/Babylon.js/blob/master/packages/dev/smartFilters/src/utils/buildTools/shaderConverter.ts) for the full object definition
1. There must be a single main function which takes in a vec2 named vUV and returns a vec4, and it must have a comment on its line like this:
`// main`
1. Functions must be declared with the open curly brace on the same line as the function name
1. Any uniforms that should have the same value across all instances of the same block should have a comment on their line like this:
`// single`
1. Uniforms can have metadata, such as a default value if no connection is made to their corresponding connection point
- In the line immediately above the uniform declaration, start with a // comment followed by a JSON object
- The supported metadata is described in the `UniformMetadataProperties` type in [shaderConverter.ts](https://github.com/BabylonJS/Babylon.js/blob/master/packages/dev/smartFilters/src/utils/buildTools/shaderConverter.ts)
### Using Your Block
#### In the Smart Filters Editor
1. You can use it right away in the [Smart Filters Editor](https://sfe.babylonjs.com) by clicking "Add" in "Custom Blocks"
#### Contributing it to the Smart Filters block library
1. Clone [BabylonJS/Babylon.js](https://github.com/BabylonJS/Babylon.js)
1. Add your .glsl file to the appropriate path in packages/dev/smartFilterBlocks/src/blocks
1. Ensure it has a namespace defined in the `GlslHeader` which matches the path
1. The build will create a blackAndWhiteBlock.block.ts file from your blackAndWhiteBlock.block.glsl file
1. Ensure that auto generated blackAndWhiteBlock.block.ts file is exported from the appropriate index.ts files
1. To test your block in a local build of the Smart Filter Editor, either:
- Select `Smart Filter Editor development (Edge)` or `Smart Filter Editor development (Chrome)` in Visual Studio Code's `Run and Debug` menu then hit F5
- Run `npm run watch:assets:smart-filters` in a terminal, then `npm run watch:source:smart-filters` in another terminal, and finally `npm run serve -w @tools/smart-filters-editor` in a third terminal
1. Create a Pull Request
#### In Your Own Project (Build Time Deserialization)
When you have the blocks available at build time, it's advantageous to deserialize them at that point so the work doesn't have to be done at runtime. You also get the benefit of property accessors for input connection points.
1. See _Configuring Your Build_ below
1. Your annotated GLSL (e.g. blackAndWhiteBlock.block.glsl) is converted into a TypeScript class by the build (e.g. blackAndWhiteBlock.block.ts)
1. You can then import that class and use it in your Smart Filters:
```typescript
import { BlackAndWhiteBlock } from "./blackAndWhiteBlock.block.js";
const block = new BlackAndWhiteBlock(smartFilter, "B&W Block");
```
#### In Your Own Project (Runtime Deserialization)
Runtime deserialization is easier, and necessary if you need to consume blocks that are not available at build time, but it is slower when loading the block for the first time.
Here's how it is done:
```typescript
const blockDefinition = importCustomBlockDefinition(serializedAnnotatedGlsl);
const block = CustomShaderBlock.Create(smartFilter, "Name Of This Instance", blockDefinition);
// Access the block inputs connection points via block.inputs and the output connection point via .output
```
## Using TypeScript + GLSL Code
Use this approach if you need a custom vertex shader, custom binding logic, or do not need to load the block implementation dynamically at runtime in your application.
### Naming Convention
The Smart Filters core comes with a build tool to convert your GLSL files into TypeScript files that export a `ShaderProgram` your TypeScript block class can use. If you plan to use your block in a package, such as @babylonjs/smart-filters-blocks, or in your own project that will use these tools, you should follow this naming convention:
`compositionBlock.fragment.glsl`
### Adding to the Babylon Blocks Library
1. Clone [BabylonJS/Babylon.js](https://github.com/BabylonJS/Babylon.js)
1. Run `npm install`
1. Now create a TypeScript and GLSL file for your block
- See compositionBlock.ts and compositionBlock.fragment.glsl as examples
1. Note that the TypeScript file imports a compositionBlock.fragment.js file which the build auto-generates from the .glsl file
1. Add an entry to [builtInBlockRegistrations.ts](https://github.com/BabylonJS/Babylon.js/blob/master/packages/dev/smartFilterBlocks/src/registration/builtInBlockRegistrations.ts)
1. To test your block in a local build of the Smart Filter Editor, either:
- Select `Smart Filter Editor development (Edge)` or `Smart Filter Editor development (Chrome)` in Visual Studio Code's `Run and Debug` menu then hit F5
- Run `npm run watch:assets:smart-filters` in a terminal, then `npm run watch:source:smart-filters` in another terminal, and finally `npm run serve -w @tools/smart-filters-editor` in a third terminal
### Adding to Your Own Project
1. See _Configuring Your Build_ below
1. You'll create a TypeScript file for your block (e.g. compositionBlock.ts) as well as a fragment shader file (e.g. compositionBlock.fragment.glsl)
1. You'll import the ShaderProgram and uniforms list from the file that buildShader.js creates at build time (e.g. compositionBlock.fragment.js) like this:
```typescript
import { uniforms, shaderProgram } from "./compositionBlock.fragment.js";
```
### Block Design Requirements
1. The main fragment shader function must take in `vec2 vUV` (the name must match)
1. You can choose if you want your shader block to be disableable
- Disableable means that it will have a disabled input connection point, and will automatically pass the main input texture through to the output if the block is disabled
- This is helpful in applications that may allow the user to turn many effects on and off, since this allows effects to be disabled instantly without the need to build a new Smart Filter runtime
- There are different disable strategies you can choose to get the best shader performance, based on the details of your block (see `BlockDisableStrategy` in [disableableShaderBlock.ts](https://github.com/BabylonJS/Babylon.js/blob/master/packages/dev/smartFilters/src/blockFoundation/disableableShaderBlock.ts))
- Do not use the `AutoSample` strategy if your shader modifies `vUV` before sampling the main input texture. `AutoSample` samples the texture with the original `vUV`; use the `Manual` strategy instead
- You must specify a main input when creating a disableable shader block
- In your fragment shader, you must put `// main` on the line that declares the uniform to be treated as the main input texture
- If you choose the manual strategy, your fragment shader must check a uniform named `disabled`, which the system will add for you, and if it is true, return texture2D(your_main_input_texture, vUV)
1. Uniform names must match connection point names
1. The ShaderBinding.bind() function must not assume texture inputs will be defined
- If the Smart Filter has been optimized, texture inputs may be replaced with return values from other blocks instead of texture uniforms
- For example, don't have logic that branches based on if the texture input was defined
### Creating Block Properties
To create a property mapped to a const in a TypeScript + GLSL Code block, follow these steps:
1. Annotate the const in the GLSL code like this:
```annotated-GLSL
// { "property": true }
const float mode = 1.;
```
2. Add a property to your new block's class (with optional editableInPropertyPage metadata to make it visible in the Smart Filters Editor):
```typescript
@editableInPropertyPage("Mode", PropertyTypeForEdition.List, "PROPERTIES", {
notifiers: { rebuild: true },
options: [
{ label: "Normal", value: 0 },
{ label: "Crazy", value: 1 },
{ label: "Odd", value: 2 },
],
})
public mode: number = 1;
```
3. Override getShaderProgram() in the new block's class
```typescript
/**
* Gets the shader program to use to render the block.
* This adds the per-instance const values to the shader program.
* @returns The shader program to use to render the block
*/
public override getShaderProgram() {
const staticShaderProgram = super.getShaderProgram();
// Since we are making changes only for this instance of the block, and
// the disableableShaderProgram is static, we make a copy and modify that.
const shaderProgramForThisInstance = CloneShaderProgram(staticShaderProgram);
shaderProgramForThisInstance.fragment.constPerInstance = `const float _mode_ = ${this.mode.toFixed(1)};`;
return shaderProgramForThisInstance;
}
```
It will then appear in the Smart Filters Editor like this:

#### Important Notes
> [!NOTE]
> 1. In your getShaderProgram() override, you must call CloneShaderProgram to ensure that the value you set is not applied to other instances of your new block type.
> 1. In the string you set constPerInstance to, you must add underscores before and after the symbol name you used in your GLSL
### Configuring Your Build
If you plan to include your new block in your own project and want to deserialize it at build time instead of runtime for the best performance, you can use build tools supplied by the Smart Filters core.
1. As part of your build, you'll need to run a tool called `buildShaders.js` and pass it a path to your blocks and the name of the Smart Filters package as parameters. Use scripts similar to these in your package.json (update ./src/blocks to the path where your block files can be found):
```package.json
"build": "npm run build:runTools && npm run build:blocks",
"build:runTools": "node ./node_modules/@babylonjs/smart-filters/dist/utils/buildTools/buildShaders.js ./src/blocks @babylonjs/smart-filters",
"build:blocks": "tsc -p ./tsconfig.build.json",
```
2. You can also use the provided [watchShaders.js](https://github.com/BabylonJS/Babylon.js/blob/master/packages/dev/smartFilters/src/utils/buildTools/watchShaders.ts) file for watch mode
- Note you'll need to reference the js version of the utility in your node_modules folder
1. Add these lines to your `.gitignore` file so that these auto-generated files aren't committed to your repo:
```text
**/*.fragment.ts
**/*.block.ts
```
1. If you use VSCode, we suggest that you add this to your `.vscode/settings.json` file so that these auto-generated files don't appear in your editor:
```json
"files.exclude": {
"**/*.fragment.ts": true,
"**/*.block.ts": true
},
```