# Mesh Blending
> Learn how to soften visible contacts between meshes with the Babylon.js screen-space mesh blending post-process.
Source: https://doc.babylonjs.com/features/featuresDeepDive/postProcesses/meshBlending
## Introduction
Mesh blending softens visible seams where separate meshes meet. It is useful for contacts such as rocks placed on terrain, structural pieces joined together, roots entering the ground, or modular environment assets whose intersection would otherwise remain obvious.
The video moves `P0061_primitive0` out of and back into the cliff, showing the contact first with mesh blending disabled and then enabled.
Mesh blending is a screen-space SceneColor post-process. It does **not** merge vertices, modify meshes, alter collision shapes, change shadow maps, or affect the depth and normal information generated by the scene. The original meshes remain independent and can still be moved, animated, culled, or removed normally.
The feature is opt-in. Only meshes with a nonzero mesh-blending tag participate.
- [Playground: Mesh blending coastal cliff scene](https://playground.babylonjs.com/#BJBKKU#12) - A coastal cliff scene demonstrating screen-space mesh blending and its configuration controls.
## How it works
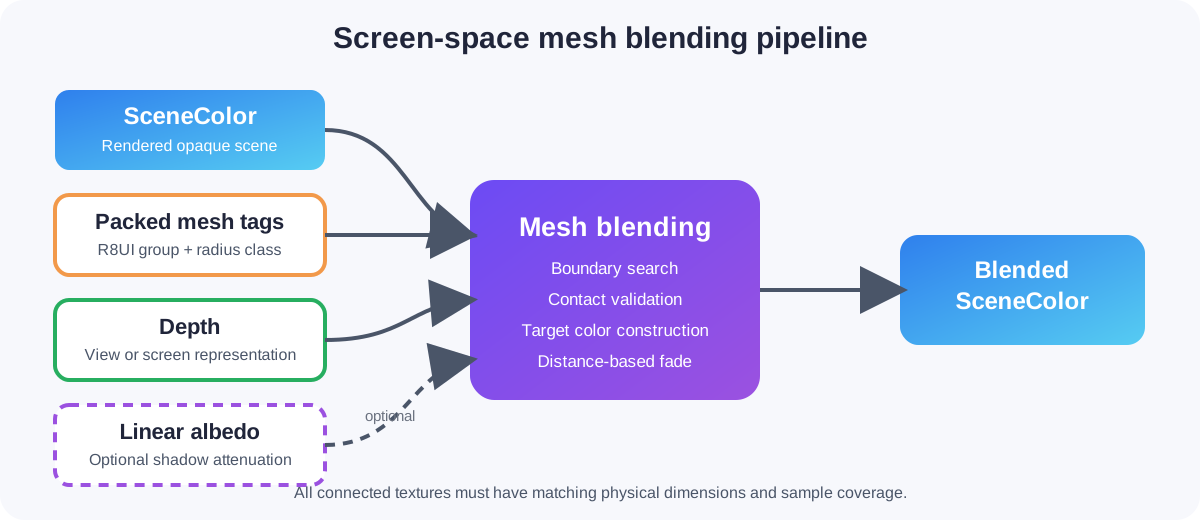
For each participating pixel, the post-process:
1. Reads the packed mesh-blending tag to determine the logical group and radius class.
2. Searches for a nearby pixel belonging to a different nonzero group.
3. Refines the boundary position.
4. Uses depth, physical span, and contact-angle checks to reject unrelated overlaps.
5. Continues onto the target surface and constructs a representative target color.
6. Blends the current SceneColor toward that target color using a distance-based fade.
7. Optionally attenuates transferred shadows using a linear base-color/albedo texture.
The search is spatially stable. It does not use temporal accumulation, does not vary from frame to frame, and does not require TAA.
## Supported configurations
Mesh blending supports:
- WebGL 2.
- WebGPU.
- Perspective and orthographic cameras.
- Standard and reverse-depth rendering.
- Opaque and alpha-tested meshes.
- FrameGraph, Node Render Graph, and classic post-process integration.
The following restrictions apply:
- WebGL 1 is not supported.
- Native is not supported because it cannot currently create the required `R8UI` mesh-tag render target.
- SceneColor, mesh tags, depth, and optional albedo must have identical physical dimensions and sample counts.
- The mesh-tag, depth, and optional albedo inputs must be single-sampled and must not use mipmaps.
- The mesh-tag texture must use nearest sampling.
- A normal texture is **not** required.
## Assigning mesh-blending tags
Each participating mesh receives a packed tag containing:
- A six-bit logical group ID from `1` through `63`.
- A two-bit radius class from `Small` through `ExtraLarge`.
```javascript
rock.meshBlendingTag = BABYLON.PackMeshBlendingTag(1, BABYLON.MeshBlendingRadiusClass.Medium);
```
Set the tag to `0` to disable blending for a mesh:
```javascript
rock.meshBlendingTag = 0;
```
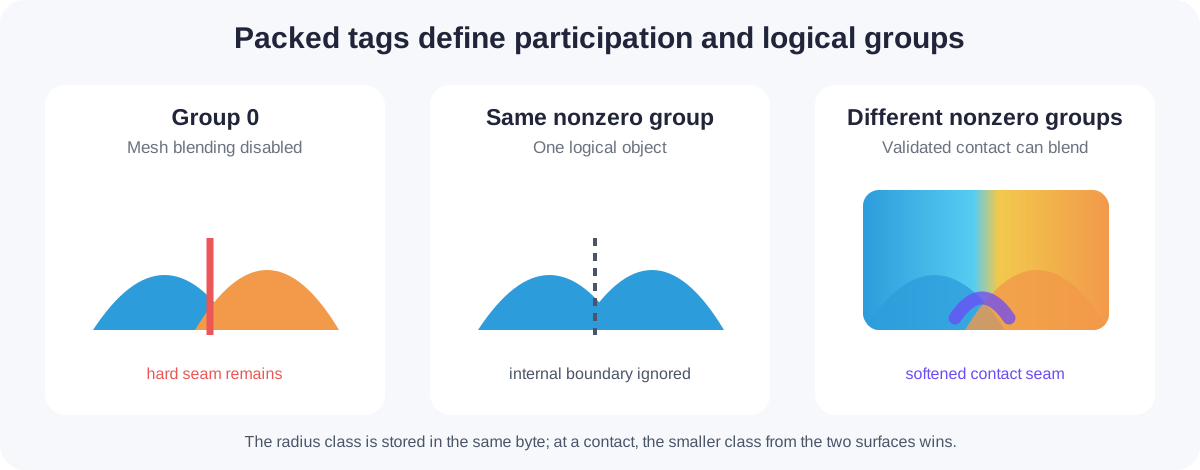
The group determines which surfaces are treated as one logical object:
- Group `0` does not participate.
- Pixels in the same nonzero group do not blend with one another.
- Pixels in different nonzero groups can blend when the contact validation succeeds.
Using the same group for all primitives that form one logical object prevents blending between those primitives while still allowing the object to blend with its surroundings.
Regular instances and thin instances use their source mesh's tag. Per-instance mesh-blending tags are not supported.
## FrameGraph integration
FrameGraph is the recommended programmatic integration. Generate the mesh tag and depth with `FrameGraphGeometryRendererTask`, render SceneColor, then connect those textures to `FrameGraphMeshBlendingTask`.
The mesh-tag texture must use `TEXTURETYPE_UNSIGNED_BYTE` with `TEXTUREFORMAT_RED_INTEGER`.
```javascript
const geometryTask = new BABYLON.FrameGraphGeometryRendererTask("geometry", frameGraph, scene);
geometryTask.camera = camera;
geometryTask.objectList = {
meshes,
particleSystems: [],
};
geometryTask.depthTexture = clearTask.outputDepthTexture;
geometryTask.samples = 1;
geometryTask.renderTransparentMeshes = false;
geometryTask.textureDescriptions = [
{
type: BABYLON.Constants.PREPASS_MESH_BLEND_TAG_TEXTURE_TYPE,
textureType: BABYLON.Constants.TEXTURETYPE_UNSIGNED_BYTE,
textureFormat: BABYLON.Constants.TEXTUREFORMAT_RED_INTEGER,
},
{
type: BABYLON.Constants.PREPASS_SCREENSPACE_DEPTH_TEXTURE_TYPE,
textureType: BABYLON.Constants.TEXTURETYPE_FLOAT,
textureFormat: BABYLON.Constants.TEXTUREFORMAT_RED,
},
{
type: BABYLON.Constants.PREPASS_ALBEDO_TEXTURE_TYPE,
textureType: BABYLON.Constants.TEXTURETYPE_UNSIGNED_BYTE,
textureFormat: BABYLON.Constants.TEXTUREFORMAT_RGBA,
},
];
frameGraph.addTask(geometryTask);
const blendTask = new BABYLON.FrameGraphMeshBlendingTask("meshBlending", frameGraph);
blendTask.camera = camera;
blendTask.sourceTexture = renderTask.outputTexture;
blendTask.meshBlendTagTexture = geometryTask.geometryMeshBlendTagTexture;
blendTask.depthTexture = geometryTask.geometryScreenDepthTexture;
blendTask.baseColorTexture = geometryTask.geometryAlbedoTexture;
blendTask.depthType = BABYLON.MeshBlendDepthType.Screen;
blendTask.quality = BABYLON.MeshBlendQuality.Medium;
frameGraph.addTask(blendTask);
```
If shadow attenuation is not needed, omit the albedo description and leave `baseColorTexture` undefined. The sampler and all shadow-estimation work are then compiled out.
- [Playground: Classic, FrameGraph, and NRGE mesh blending](https://playground.babylonjs.com/#O05LI8#6) - Compare equivalent classic post-process, FrameGraph, and Node Render Graph mesh-blending configurations.
## Node Render Graph Editor integration
The `Mesh Blending` block is the recommended integration when the render graph must be edited visually or serialized.
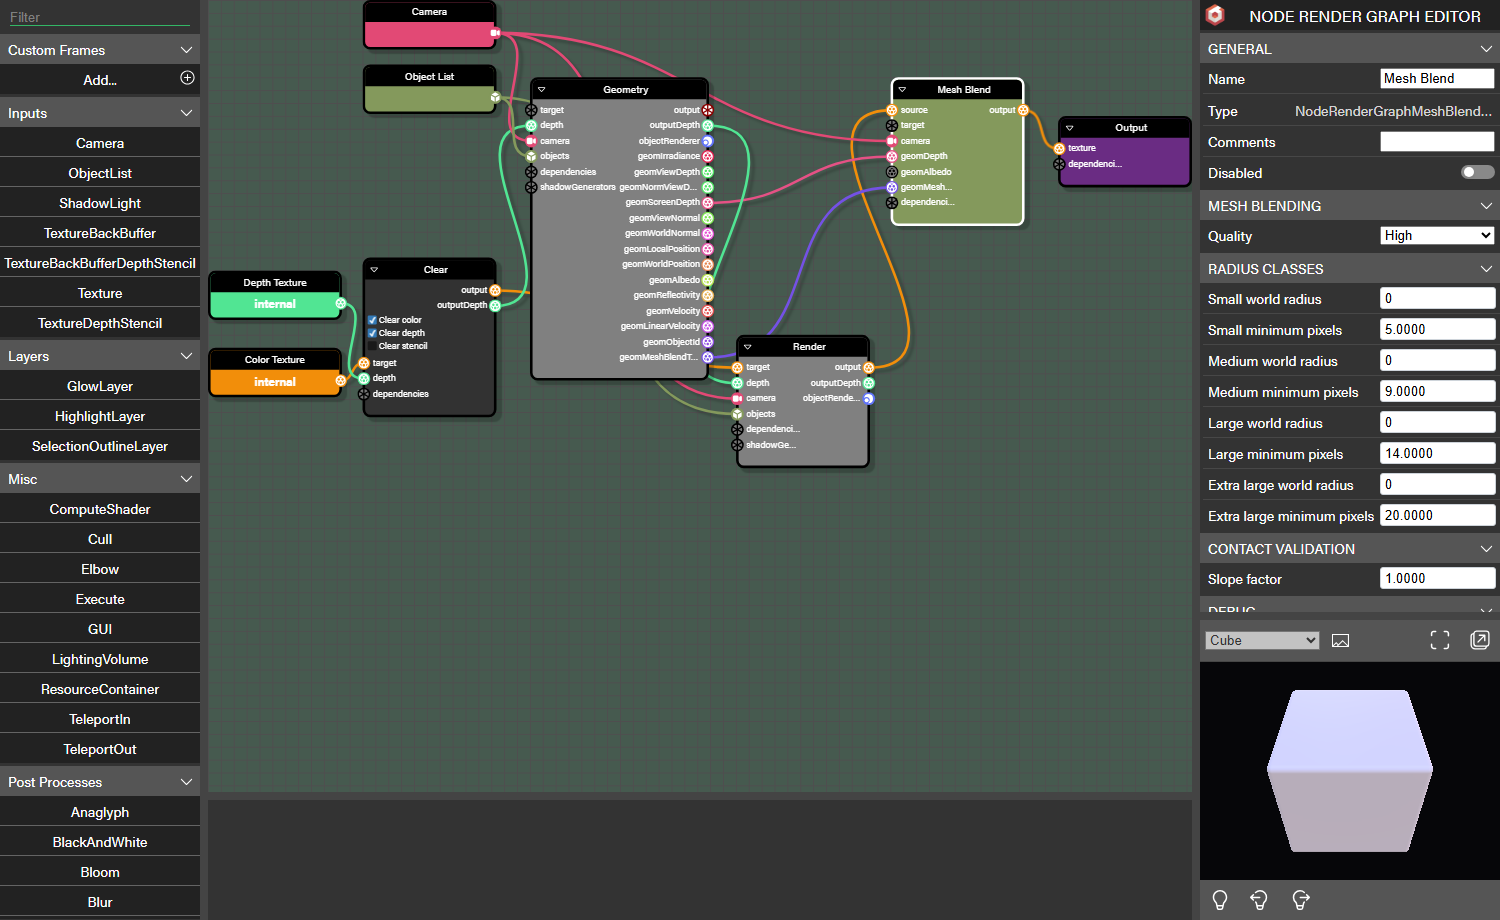
Connect:
- SceneColor to **source**.
- The active camera to **camera**.
- `GeometryRenderer.geomViewDepth` or `GeometryRenderer.geomScreenDepth` to **geomDepth**.
- `GeometryRenderer.geomMeshBlendTag` to **geomMeshBlendTag**.
- Optionally, `GeometryRenderer.geomAlbedo` to **geomAlbedo**.
- The mesh-blending **output** to the next post-process or the graph output.
The depth connection automatically selects the matching depth representation. The albedo connection is optional.
Changing quality, debug mode, depth representation, or albedo availability changes the compiled shader variant. Rebuild the graph after changing connections or compile-time options programmatically.
The coastal-cliff example stores the graph separately as `#CC8X3G#0` and loads it at runtime:
```javascript
const nodeRenderGraph =
await BABYLON.NodeRenderGraph.ParseFromSnippetAsync(
"CC8X3G#0",
scene,
{
autoConfigure: false,
autoFillExternalInputs: false,
},
);
nodeRenderGraph.getBlockByName("Camera").value = camera;
nodeRenderGraph.getBlockByName("Geometry Objects").value =
geometryObjectList;
nodeRenderGraph.getBlockByName("Render Objects").value =
renderObjectList;
nodeRenderGraph.getBlockByName("Shadow Light").value =
directionalLight;
scene.frameGraph = nodeRenderGraph.frameGraph;
await nodeRenderGraph.buildAsync();
```
- [Playground: Mesh blending Node Render Graph setup](https://playground.babylonjs.com/#BJBKKU#14) - The coastal cliff scene loading its serialized mesh blending Node Render Graph with ParseFromSnippetAsync.
## Classic post-process integration
The classic path consumes caller-owned textures. It does not enable, reconfigure, resize, or dispose the Geometry Buffer Renderer.
```javascript
const geometryBufferRenderer = scene.enableGeometryBufferRenderer();
geometryBufferRenderer.samples = 1;
geometryBufferRenderer.renderTransparentMeshes = false;
geometryBufferRenderer.enableMeshBlendingTag = true;
geometryBufferRenderer.enableScreenspaceDepth = true;
const tagIndex = geometryBufferRenderer.getTextureIndex(BABYLON.GeometryBufferRenderer.MESH_BLEND_TAG_TEXTURE_TYPE);
const depthIndex = geometryBufferRenderer.getTextureIndex(BABYLON.GeometryBufferRenderer.SCREENSPACE_DEPTH_TEXTURE_TYPE);
const gBuffer = geometryBufferRenderer.getGBuffer();
const meshBlending = new BABYLON.MeshBlendingPostProcess("meshBlending", scene, camera, {
meshBlendTagTexture: gBuffer.textures[tagIndex],
depthTexture: gBuffer.textures[depthIndex],
depthType: BABYLON.MeshBlendDepthType.Screen,
quality: BABYLON.MeshBlendQuality.Medium,
});
```
If a separate base-color texture is supplied, it must be linear, use matching dimensions and sample coverage, and be resized whenever the Geometry Buffer Renderer is resized.
The classic wrapper is runtime-only. It is omitted from scene serialization, `serialize()` throws, and `clone()` returns `null`. Use FrameGraph or NRGE for serializable mesh blending.
## Configuration overview
The classic post-process, FrameGraph task, and NRGE block use the same underlying `ThinMeshBlendingPostProcess`. Their quality, radius, slope, depth, and debug settings therefore behave identically.
`quality`, `debugMode`, `depthType`, and the presence of a base-color texture select compile-time shader variants. Changing one of these settings recompiles the effect. Radius values and `slopeFactor` are uniforms and can be adjusted without recompiling.
### Quality
`MeshBlendQuality.Medium` is the default.
The close-up focuses on the cliff's right contact boundary, where the differences between Medium, High, and Cinematic are most visible.
| Quality | Behavior | Recommended use |
| ----------- | ---------------------------------------------------------------------------------------------------------------------------------------------------------- | ---------------------------------------------------------------------------------------------------- |
| `Low` | Uses the lowest search and refinement workload, sRGB color interpolation, a reduced effective-radius scale, and no tiny-object or multi-target safeguards. | Large screen coverage, low-end hardware, or scenes with simple two-surface contacts. |
| `Medium` | Uses balanced search and refinement, OKLab interpolation, and a radius scale close to the authored value. | Starting point for most scenes. |
| `High` | Adds full search rotation, immediate close-neighbor fallback, tiny-object protection, and a secondary target at multi-mesh junctions. | Detailed contacts, small projected objects, and junctions where Medium leaves visible artifacts. |
| `Cinematic` | Uses eight search directions and the densest radial and exact-boundary work, with the High-quality safeguards and OKLab interpolation. | High-end targets, captures, or constrained scenes where the additional quality is visibly justified. |
Quality changes more than the number of texture reads. It can also change color interpolation, fallback behavior, tiny-object handling, multi-target selection, and the scale applied to the effective radius. Recheck the authored radii when moving between Low and a higher quality.
### Radius classes
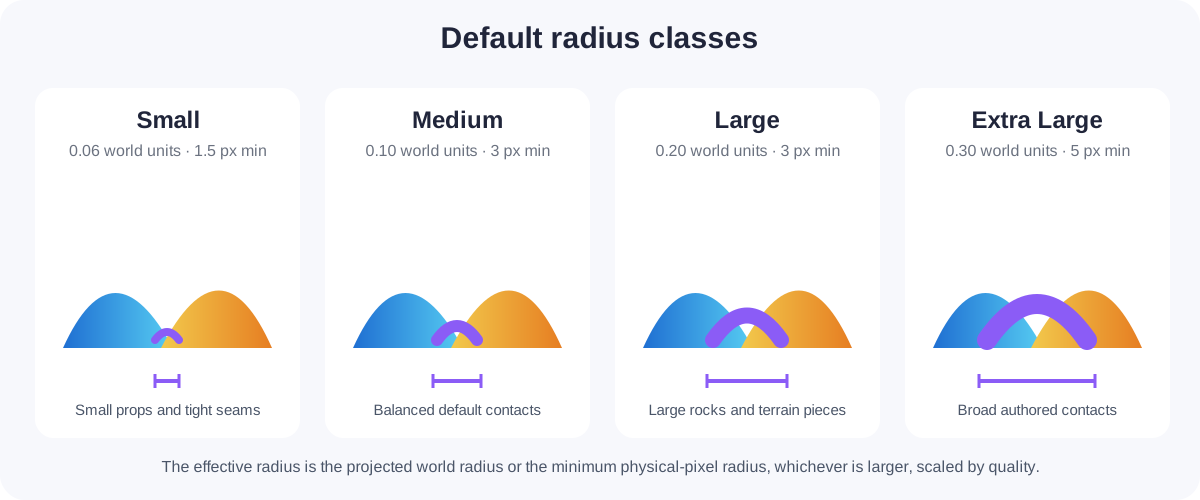
Each radius class contains two values:
- `worldRadius` is the authored radius in Babylon.js world units. It keeps the visible blend width approximately stable in the world as the camera moves.
- `minimumProjectedRadius` is a lower bound measured in physical render-target pixels. It keeps distant contacts from collapsing below a useful search width.
The effective radius is the larger of the projected world radius and the minimum projected radius, multiplied by the selected quality's radius scale.
| Radius class | Default world radius | Default minimum projected radius |
| ------------ | -------------------: | -------------------------------: |
| `Small` | `0.06` | `1.5` pixels |
| `Medium` | `0.10` | `3` pixels |
| `Large` | `0.20` | `3` pixels |
| `ExtraLarge` | `0.30` | `5` pixels |
At a contact, the smaller of the two participating radius classes wins. This prevents a surface with a broad radius from forcing an equally broad blend onto a surface authored for a tight contact.
```javascript
blendTask.radiusClasses[BABYLON.MeshBlendingRadiusClass.Large].worldRadius = 0.35;
blendTask.radiusClasses[BABYLON.MeshBlendingRadiusClass.Large].minimumProjectedRadius = 4;
```
The four-element tuple cannot be resized, reordered, or have an entry replaced. The `worldRadius` and `minimumProjectedRadius` values inside each entry remain mutable and validate that assigned values are finite and non-negative.
Use `configure()` when several values should be validated and applied together:
```javascript
blendTask.configure({
quality: BABYLON.MeshBlendQuality.High,
radiusClasses: [
{ worldRadius: 0.04, minimumProjectedRadius: 1.5 },
{ worldRadius: 0.08, minimumProjectedRadius: 2.5 },
{ worldRadius: 0.16, minimumProjectedRadius: 3 },
{ worldRadius: 0.28, minimumProjectedRadius: 5 },
],
slopeFactor: 2.5,
});
```
Start by matching `worldRadius` to the physical scale of the contact. Increase `minimumProjectedRadius` only when distant seams become visible. Large pixel minimums can make distant blending look wider than the authored world-space contact.
### Slope factor
`slopeFactor` narrows the effective radius when the reconstructed depth slope does not resemble a plausible surface contact. The default is `2`.
This close-up uses Cinematic quality and smoothly increases `slopeFactor` from `1` to `8`.
- `1` disables slope-based narrowing.
- Values above `1` progressively restrict blending at less plausible angles.
- Higher values can reduce false blends between overlapping silhouettes, but values that are too high can reopen valid seams.
Only finite values greater than or equal to `1` are accepted.
### Depth representation
`depthType` must describe the data stored in the connected depth texture. The default is `MeshBlendDepthType.View`.
| Depth type | Expected data | Typical FrameGraph source |
| ---------- | ------------------------------------------------------- | ------------------------------------------------- |
| `View` | Signed camera-space Z written by the geometry renderer. | `geometryViewDepthTexture` or `geomViewDepth` |
| `Screen` | Hardware screen depth in the normalized depth range. | `geometryScreenDepthTexture` or `geomScreenDepth` |
Both representations support perspective, orthographic, and reverse-depth cameras. They should produce equivalent blending when the property and texture agree. A mismatched `depthType` reconstructs incorrect positions and can cause missing contacts, false contacts, or invalid-depth debug output.
In NRGE, connecting a view-depth or screen-depth output to `geomDepth` selects the matching representation during graph build.
### Optional base color and shadow attenuation
Mesh blending samples SceneColor from the target surface. Without additional information, a dark shadow near the target can be transferred across the seam as if it were part of the surface's base color.
Supplying a linear base-color/albedo texture enables a heuristic that estimates this lighting difference and attenuates the transferred shadow.
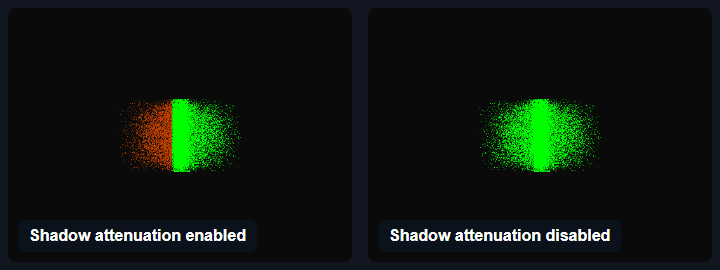
These are `ShadowAttenuation` **debug views**, not the final rendered colors:
- Green means an attenuation multiplier of `1`: the normal mesh-blending fade is preserved.
- Red means an attenuation multiplier near `0`: color transfer across the seam is strongly suppressed.
- Yellow and orange are intermediate amounts of attenuation.
- Blue marks pixels where the near-seam color correction was applied.
The red-orange area in the enabled image is therefore expected. The albedo comparison identified part of the dark SceneColor as lighting or shadow rather than surface color, so the effect reduces how much of that darkness is transferred across the seam. In the disabled image, the attenuation multiplier remains `1`, which produces the uniformly green diagnostic output.
- FrameGraph: assign `baseColorTexture`.
- NRGE: connect `geomAlbedo`.
- Classic: assign `baseColorTexture` in the constructor or through the property.
The input is optional. When omitted, the albedo sampler and all shadow-estimation shader work are compiled out; no fallback texture is created.
Shadow attenuation does not modify shadow maps, lights, materials, or the scene's actual shadowing. It only changes how much sampled SceneColor is transferred across the blend.
- [Playground: Mesh blending shadow attenuation](https://playground.babylonjs.com/#CYSYH2#7) - A focused comparison showing how optional linear albedo attenuates shadow transfer across a blended seam.
### Debug modes
Debug modes compile deterministic diagnostic views into the post-process. They are intended for authoring and troubleshooting rather than final rendering.
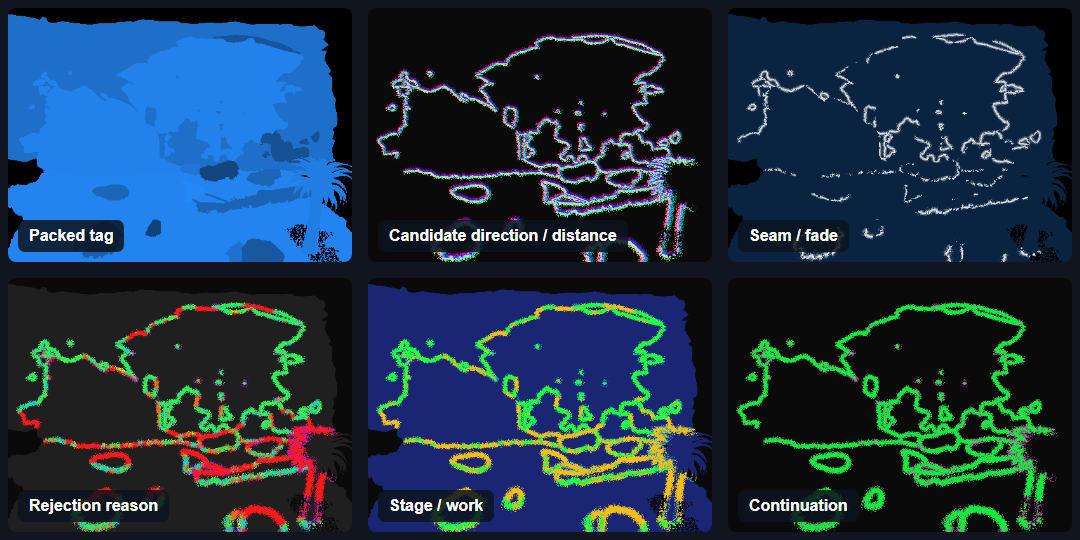
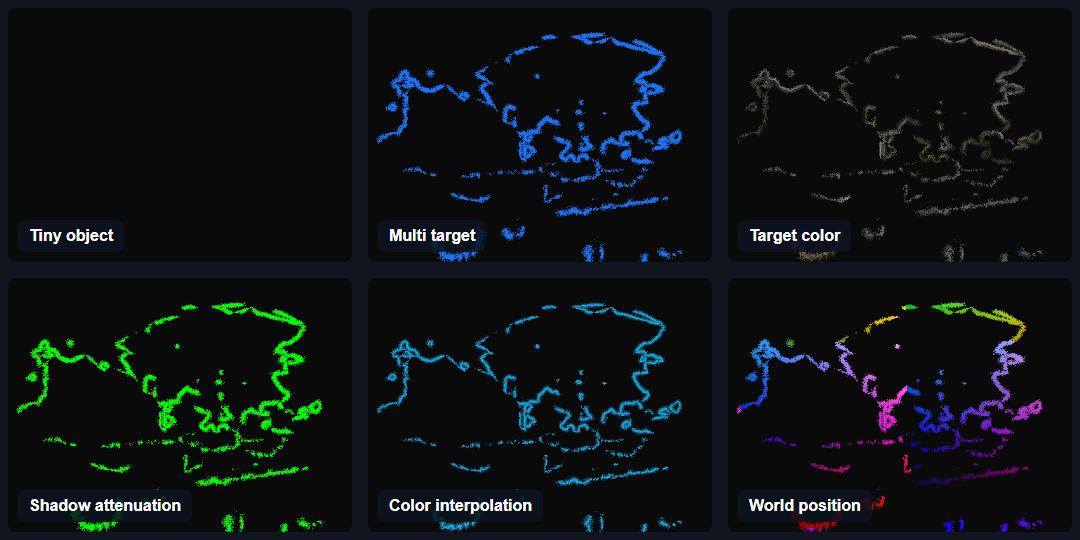
| Debug mode | Interpretation |
| ---------------------------- | ------------------------------------------------------------------------------------------------------------------------------------------------------------------------------------------------------------------------------------------------------------------------------------------------------------------------------ |
| `Off` | Renders the final blended SceneColor. |
| `PackedTag` | Black means group `0`. Blue, green, orange, and pink identify the four radius classes. Brightness varies with the logical group ID so adjacent groups remain distinguishable. |
| `CandidateDirectionDistance` | Red and green encode the selected 2D search direction after remapping from `[-1, 1]` to `[0, 1]`. Blue decreases as the candidate boundary approaches the maximum search radius. Near-black means no candidate was found. |
| `SeamFade` | The dim base color identifies the selected radius class. The result approaches white as the seam fade becomes stronger. |
| `RejectionReason` | Accepted contacts range from blue to green according to slope narrowing. Dark gray means no candidate, purple means continuation failed, magenta means invalid depth, red means excessive depth separation, orange means a foreground/background conflict, and yellow means the physical span or effective radius was invalid. |
| `StageWork` | Progresses from dark blue through cyan, green, and yellow as the pixel reaches later processing stages. Brighter later-stage colors generally indicate more shader work. |
| `Continuation` | Near-black means no candidate, magenta means target continuation failed, yellow means the fallback path was used, and green means normal continuation succeeded. |
| `TinyObject` | Shows the ratio used to reduce the effective radius for thin projected objects. Red indicates a stronger reduction and blue indicates a radius closer to the normal search radius. Dim output means no reduction was applied. This view is neutral at quality levels that do not enable the safeguard. |
| `MultiTarget` | Blue means only the primary target was accepted. Purple means a secondary candidate was found but rejected. White means both primary and secondary targets were accepted. Near-black means no valid target. |
| `TargetColor` | Repeating four-pixel bands show the farther sample, boundary-plus-one sample, boundary-plus-two sample, and the final constructed target color. This makes sampling discontinuities visible. |
| `ShadowAttenuation` | Green means no attenuation of the blend fade. Increasing red means shadow transfer is being suppressed. Blue marks pixels where the near-seam color correction was used. The view is neutral when no base-color texture is connected. |
| `ColorInterpolation` | Orange identifies sRGB interpolation and cyan identifies OKLab interpolation. Brightness increases with the adjusted blend fade. |
| `WorldPosition` | Displays a repeating RGB visualization of reconstructed world position. It is useful for finding depth reconstruction, camera, or depth-type errors; the colors are not absolute world coordinates. |
Changing `debugMode` recompiles the shader. Return it to `Off` for final rendering.
## Transparency
Transparent rendering remains controlled by the application.
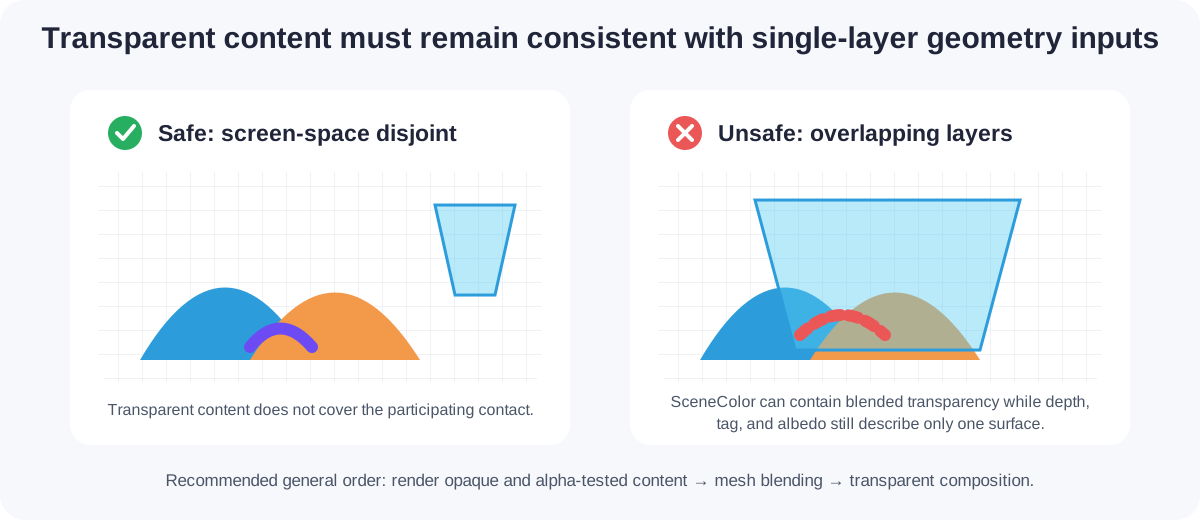
Transparent meshes that do not overlap participating blended surfaces in screen space can be rendered safely. Overlapping transparent surfaces can make SceneColor inconsistent with the single-layer depth, albedo, and tag textures, producing holes, false boundaries, or incorrect transferred colors.
For general scenes, render opaque and alpha-tested participating meshes, apply mesh blending, and composite transparent content afterward.
On WebGL 2, rendering transparent meshes into the integer tag attachment requires per-target blending support so blending can remain enabled for color attachments while being disabled for the integer attachment. Unsupported configurations are rejected explicitly.
## Performance
Mesh blending is a full-screen post-process, but pixels with group `0` exit early. Cost therefore depends heavily on participating screen coverage and the selected quality level.
Start with `Medium`, profile on the target hardware, and compare against `Low` and `High`. Reserve `Cinematic` for cases where its additional search directions and boundary work provide a visible benefit.
The feature demo exposes `window.runMeshBlendBenchmark()`, which reports same-device GPU-time ratios for disabled, Low, Medium, High, and Cinematic modes. These measurements are diagnostic and are not universal performance thresholds.
- [Playground: Mesh blending feature and performance demo](https://playground.babylonjs.com/#XVZTSI#3) - Explore mesh groups, radius classes, quality levels, debug views, alpha-tested meshes, and relative GPU timings.
## Troubleshooting
### Nothing blends
- Confirm that both surfaces have nonzero tags.
- Confirm that the two surfaces use different group IDs.
- Increase the relevant world radius temporarily.
- Use `PackedTag` to verify the tags and radius classes.
- Use `CandidateDirectionDistance` to see whether another group is found.
- Use `RejectionReason` to identify which contact check fails.
### The effect is too thin when the camera moves away
Increase `minimumProjectedRadius` for the affected radius class. This value is measured in physical render-target pixels, not CSS pixels.
### The effect is too wide or reaches unrelated surfaces
- Reduce `worldRadius`.
- Reduce `minimumProjectedRadius` if the problem occurs mainly at a distance.
- Increase `slopeFactor` to narrow contacts with less plausible depth slopes.
- Use smaller radius classes on the surfaces that require precise contacts.
### The seam changes when switching quality
Quality levels apply different radius scales and enable different search safeguards. Retune the authored radii after selecting the production quality rather than treating quality as only a performance switch.
### Dark colors or shadows smear across a seam
Connect a linear base-color/albedo texture and inspect `ShadowAttenuation`. Verify that the albedo texture has the same dimensions and sample count as SceneColor and depth.
### Geometry appears missing or stale
- Confirm that all input textures have matching physical dimensions.
- Confirm that all inputs are single-sampled and have matching sample counts.
- Disable mipmaps for the mesh-tag, depth, and optional albedo textures.
- Use nearest sampling for the mesh-tag texture.
- Confirm that `depthType` matches the connected depth texture.
- Check whether overlapping transparent content is making SceneColor disagree with the single-layer geometry inputs.
### Alpha-tested edges do not match
Generate the mesh tags through the Geometry Buffer Renderer or FrameGraph Geometry Renderer. This ensures that tags are written only by fragments that survive the material's configured alpha cutoff.
### Instances need different tags
Regular and thin instances intentionally use their source mesh's tag. Split instances across source meshes when they need different mesh-blending groups or radius classes.
### The classic post-process does not serialize
This is intentional because its input textures are caller-owned runtime resources. Use `FrameGraphMeshBlendingTask` or the NRGE block when the setup must be serialized.
## References and acknowledgements
The Babylon.js implementation was independently written. The following public resources informed its behavior, algorithm, performance choices, and color interpolation:
- [MeshBlend](https://meshblend.lervik.com/) provided the behavioral target and parameter-model inspiration. Babylon.js does not use or reproduce the plugin's source code.
- Jack Tollenaar's [Screen space mesh seam blending](https://www.jacktollenaar.top/articles/meshblending.html) describes screen-space seam detection, mirrored color sampling, and post-process blending concepts used as implementation references.
- Jack Tollenaar's [Fast mesh seam blending](https://www.jacktollenaar.top/articles/meshblending2.html) provided performance analysis and optimization considerations. Babylon.js does not reproduce its indirect-compute pipeline.
- Björn Ottosson's [A perceptual color space for image processing](https://bottosson.github.io/posts/oklab/) defines the OKLab conversion and interpolation used by the higher quality modes.
## Further reading
- [https://doc.babylonjs.com/typedoc/classes/babylon.meshblendingpostprocess](https://doc.babylonjs.com/typedoc/classes/babylon.meshblendingpostprocess)
- [https://doc.babylonjs.com/typedoc/classes/babylon.framegraphmeshblendingtask](https://doc.babylonjs.com/typedoc/classes/babylon.framegraphmeshblendingtask)
- [https://doc.babylonjs.com/typedoc/classes/babylon.noderendergraphmeshblendingpostprocessblock](https://doc.babylonjs.com/typedoc/classes/babylon.noderendergraphmeshblendingpostprocessblock)