Troubleshooting Solid Particle System Visibility Issues
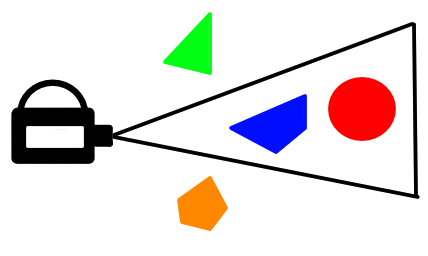
To render the meshes on the screen, BJS uses their bounding box (BBox): if the BBox is in the frustum, then the mesh is selected to be rendered on the screen. This method is really performant as it avoids to make the GPU compute things that wouldn't be visible. The BBox of each mesh is recomputed when its World Matrix is updated. This is called frustum culling. In the following example image, the green and orange objects are frustum culled.
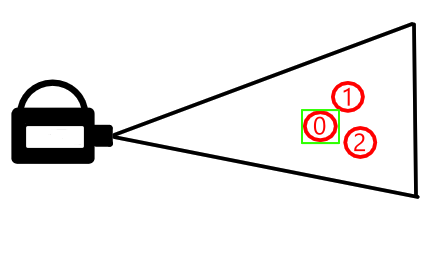
When you create an SPS, unless you use the positionFunction at creation time, all its particles are set by default at the position (0, 0, 0). So the bounding box size of the SPS mesh is initially the size of its biggest particle. In the following example image, the size of the entire SPS is taken as just the size of the first red object.
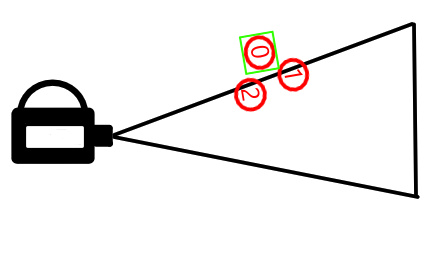
If you animate your particles without updating the SPS mesh World Matrix, its BBox may remain much smaller than the space currently occupied by the moving particles. So, if this small BBox moves out of the screen (for example, due to camera rotation), the whole SPS can disappear at once. In the following example, once the first red object's bounding box is out of the frustum, the entire SPS mesh will be culled, even though there are still two objects visible to the camera.
To manage SPS visibility, you have several options: the methods SPS.refreshVisibleSize() and SPS.setVisibilityBox(size), and the properties SPS.isAlwaysVisible, SPS.computeBoundingBox, SPS.isVisibilityBoxLocked, and SPS.autoUpdateSubMeshes.
-
SPS.refreshVisibleSize(): updates the SPS mesh BBox size on demand. This is an intensive computation, so it is better not to use it in the render loop on every frame. You could call it once the mesh has reached its maximum size, for instance. This is the method to use if you have an SPS located in its own space somewhere in your scene, like a particle explosion, a fountain, etc. Remember when using this method that it iterates over each mesh's vertices. So if your mesh has 20K vertices, which is common with an SPS, it needs 20K iterations. -
SPS.isAlwaysVisible(default false): if true, forces the SPS mesh to be computed by the GPU even if its BBox is not visible. This property is useful when the player moves inside the SPS (maze, asteroid field) or if the SPS is always bigger than the visible part on the screen. Note that setting it to true does not recompute the BBox size, so if you need to update the BBox for some reason (pickability, collisions, etc.), you also have to callSPS.refreshVisibleSize()at least once. -
SPS.computeBoundingBox(default false): if set to true, the next calls tosetParticles()will compute the mesh bounding box within the same loop as the particle computations. The reasonrefreshVisibleSize()andSPS.computeBoundingBoxboth exist is thatrefreshVisibleSize()can be called at any time and does not requiresetParticles(), whereasSPS.computeBoundingBoxis taken into account for the BBox computation only whensetParticles()is called.
Note thatSPS.computeBoundingBoxcan be set to true or false at any time and will affect only the next calls ofsetParticles(). -
SPS.setVisibilityBox(size): sets a fixed size for the SPS mesh BBox whatever its actual size. This may be useful when you know in advance the limits that the visible particles will not exceed. Note that setting a value does not prevent any further BBox recomputation. -
SPS.isVisibilityBoxLocked(default false): if true, the SPS mesh BBox won't be computed any longer until it is reset to false. -
SPS.autoUpdateSubMeshes(default false): When an SPS contains multiple materials, it creates a SubMesh for each material. WhenautoUpdateSubMeshesis set to true, these SubMeshes will be recomputed, along with their bounding boxes, on the next call tosetParticles.
So which method should you use? It depends on your needs.
If your SPS is spread all around the camera's environment, like an asteroid field, you may use SPS.isAlwaysVisible.
If you need variable visibility or pickability, you will need to set the bounding box at least once.
So if your SPS stays within some fixed bounds whose values you do not know, you may use SPS.refreshVisibleSize() at least once when the SPS has reached those limits, and then lock the visibility box.
If the SPS stays within some known limits, then it is better to use SPS.setVisibilityBox(size) with the right value and then lock the visibility box.
Finally, if you still need pickability or variable visibility and do not know how your SPS will evolve, then you might set SPS.computeBoundingBox to true, and SPS.autoUpdateSubMeshes if the SPS has multiple materials.
Particle In Frustum
When the SPS is enabled to manage particle intersections, each particle is given a bounding box and a bounding sphere.
You can then check whether a particle intersects the camera frustum with the method particle.isInFrustum(frustumPlanes, [cullingStrategy]), just as you would with meshes.
scene.updateTransformMatrix(); // force the plane computation oncevar frustumPlanes = scene.frustumPlanes;// then in some loop ...if (!particle.isInFrustum(frustumePlanes)) { p.alive = false;}Unlike meshes, you cannot use .isInFrustum() to cull particles that would not be rendered, because all the particles are always rendered, meaning they are passed to the GPU even when invisible. You can only use this test to customize the processing applied to the particles.
Example: You would want to not compute the particles outside the frustum to gain some performance.
The test done by isInFrustum() also has its own CPU cost, so it is probably not a good idea to run it on thousands of particles on every frame.
Ultimately, it is up to you to decide whether the test is worth it for your needs.
Let's imagine a case where each particle computation is really intensive (example : when using computeParticleVertex). In this case, the frustum test could be faster than the particle computation, so it would be interesting to use it to disable the particle computation for particles outside the frustum.
In the following example, the computation cost is directly related to the number of vertices and should not change whatever the camera direction. But, because we disable the particles outside the frustum, if you rotate the camera to isolate one or two worms in the camera field, you can check the performance gain.
Note: the default culling strategy used in the particle frustum test is the fastest (BoundingSphereOnly).
You can change it at will for each particle by using the same values as the AbstractMesh class's static CULLINGSTRATEGY_XXX properties.