Introduction To Lights
Lights
Lights are used, as you would expect, to affect how meshes are seen, in terms of both illumination and color. All meshes allow light to pass through them unless shadow generation is activated. The default number of allowed lights is four, but this can be increased.
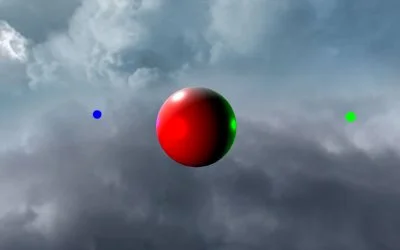
A pretty sphere with multiple lights
Types of Lights
There are five types of lights that can be used, each with a range of lighting properties.
The Point Light
A point light is a light defined by a unique point in world space. The light is emitted in every direction from this point. A good example of a point light is a standard light bulb.
import { PointLight } from "@babylonjs/core/Lights/pointLight";import { Vector3 } from "@babylonjs/core/Maths/math.vector";const light = new PointLight("pointLight", new Vector3(1, 10, 1), scene);The Directional Light
A directional light is defined by a direction (what a surprise!). The light is emitted from everywhere in the specified direction and has an infinite range. An example of a directional light is a distant planet lit by the apparently parallel lines of light from its sun. Light shining downward will light the top of an object.
import { DirectionalLight } from "@babylonjs/core/Lights/directionalLight";import { Vector3 } from "@babylonjs/core/Maths/math.vector";const light = new DirectionalLight("DirectionalLight", new Vector3(0, -1, 0), scene);The Spot Light
A spot light is defined by a position, a direction, an angle, and an exponent. These values define a cone of light starting from the position, emitting toward the direction.
The angle, in radians, defines the size (field of illumination) of the spotlight's conical beam, and the exponent defines how quickly the light decays with distance (reach).
A simple use of a spot light
import { SpotLight } from "@babylonjs/core/Lights/spotLight";import { Vector3 } from "@babylonjs/core/Maths/math.vector";const light = new SpotLight("spotLight", new Vector3(0, 30, -10), new Vector3(0, -1, 0), Math.PI / 3, 2, scene);The Hemispheric Light
A hemispheric light is an easy way to simulate ambient environmental light. A hemispheric light is defined by a direction, usually 'up' toward the sky. However, the full effect is achieved by setting the color properties.
import { HemisphericLight } from "@babylonjs/core/Lights/hemisphericLight";import { Vector3 } from "@babylonjs/core/Maths/math.vector";const light = new HemisphericLight("HemiLight", new Vector3(0, 1, 0), scene);The Rectangular Area Light
A rectangular area light is defined by its position, width, and height. It emits light from the resulting surface towards the -Z direction. Even though the RectAreaLight class itself does not have a direction component, it can be attached to a transform node to be rotated and moved around.
import { RectAreaLight } from "@babylonjs/core/Lights/rectAreaLight";import { Vector3 } from "@babylonjs/core/Maths/math.vector";const light = new RectAreaLight("areaLight", new Vector3(0, 1, 0), 2, 2, scene);One important thing to note is that, due to differences in implementation, StandardMaterial will reflect light based on its "roughness" value (instead of specular power, as with other lights). This difference in behavior is significant, and you should set the correct roughness value in the scene to achieve the desired look.
Also, the current implementation for RectAreaLight does not cast shadows, but we plan to implement this in the future.
Using emission textures with RectAreaLight
Emission textures can be used as light sources for RectAreaLight by assigning them to the .emissionTexture property. However, these textures require pre-processing to work properly.
Pre-processing can be done offline (recommended) or at runtime using AreaLightTextureTools. Runtime processing takes several seconds for typical texture sizes (1024 or 2048), so offline processing is preferred for production use. The runtime tool is provided for prototyping and experimentation.
Here's how to use an emission texture at runtime:
import { RectAreaLight } from "@babylonjs/core/Lights/rectAreaLight";import { Texture } from "@babylonjs/core/Materials/Textures/texture";import { Vector3 } from "@babylonjs/core/Maths/math.vector";import { AreaLightTextureTools } from "@babylonjs/core/Misc/areaLightsTextureTools";// AreaLightTextureTools can be created once and reused for processing multiple textures. const textureProcessor = new AreaLightTextureTools(engine);// Create your RectAreaLightconst light = new RectAreaLight("areaLight", new Vector3(0, 1, 0), 2, 2, scene);// Image that you want to use as emission.const emissionTexture = new Texture(textureURL, scene);// Preprocess the texture to get the one that should be used by RectAreaLightlight.emissionTexture = await textureProcessor.processAsync(emissionTexture);We also provide an offline tool that can directly pre-process emission textures: Babylon Texture Tools. By going to the "Area Light" tab, users can drag and drop a PNG into the tool and use the "Render" button to generate the pre-processed texture. The resulting texture can be directly assigned to light.emissionTexture without any additional steps.
Color Properties
There are three properties of lights that affect color. Two of these, diffuse and specular, apply to all light types; the third, groundColor, applies only to a Hemispheric Light.
- Diffuse gives the basic color to an object;
- Specular produces a highlight color on an object.
In these playgrounds, see how the specular color (green) is combined with the diffuse color (red) to produce a yellow highlight.
Point Light Example Directional Light Example Spot Light Example Hemispheric Light Example Rectangular Area Light ExampleFor a hemispheric light, the groundColor is the light in the opposite direction from the one specified during creation. You can think of the diffuse and specular light as coming from the center of the object in the given direction, and the groundColor light as coming from the opposite direction.
Hemispheric Light On 2 SpheresWhite hemispheric light with a black groundColor is a useful lighting method.
Intersecting Lights Colors
Intersecting Spot LightsLimitations
Babylon.js allows you to create and register as many lights as you choose, but note that a single material can only handle a defined number of simultaneous lights (by default, this value is 4, which means the first four enabled lights in the scene's lights list). You can change this number with this code:
import { StandardMaterial } from "@babylonjs/core/Materials/standardMaterial";const material = new StandardMaterial("mat", scene);material.maxSimultaneousLights = 6;But beware! By default, all meshes are considered lit by all lights, even when they are not physically lit. Calculating whether a mesh can be lit by a light would be too time-consuming. Also, with more dynamic lights, Babylon.js generates larger shaders, which may not be compatible with low-end devices such as phones or small tablets. In this case, Babylon.js will try to recompile shaders with fewer lights.
6 Intersecting Point LightsOn, Off or Dimmer
Every light can be switched off using
light.setEnabled(false);and switched on with
light.setEnabled(true);Want to dim or brighten the light? Then set the intensity property (default value is 1).
light0.intensity = 0.5;light1.intensity = 2.4;For point and spot lights, you can set how far the light reaches using the range property.
light.range = 100;Choosing Meshes to Light
When a light is created, all current meshes will be lit by it. There are two ways to exclude some meshes from being lit. A mesh can be added to the excludedMeshes array, or the meshes that should not be excluded can be added to the includedOnlyMeshes array. The number of meshes to exclude can help determine which method to use. In the following example, two meshes are excluded from light0 and twenty-three from light1. Commenting out lines 26 and 27 in turn will show the individual effect.
Example of Excluding Meshes to LightLighting Normals
How lights react to a mesh depends on values set for each mesh vertex, called normals, shown in the picture below as arrows indicating the direction of the lighting normals. The picture shows two planes and two lights. One light is a spot light and the other is a point light. The front face of each plane is the one you see when the normals point toward you; the back face is the opposite side.
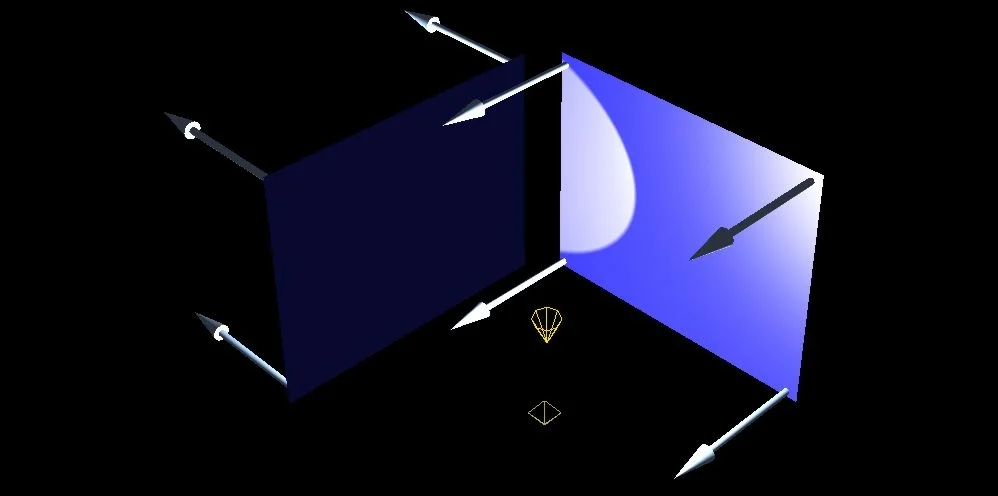
A blue back-faced plane and a blue front-faced plane, with a spot light and point light
As you can see, the lights only affect the front face and not the back face.
Lightmaps
Complex lighting can be computationally expensive to compute at runtime. To save on computation, lightmaps may be used to store calculated lighting in a texture which will be applied to a given mesh.
import { StandardMaterial } from "@babylonjs/core/Materials/standardMaterial";import { Texture } from "@babylonjs/core/Materials/Textures/texture";const lightmap = new Texture("lightmap.png", scene);const material = new StandardMaterial("material", scene);material.lightmapTexture = lightmap;Note: To use the texture as a shadow map instead of a lightmap, set the material.useLightmapAsShadowmap field to true.
The way that the scene lights are blended with the lightmap is based on the lightmapMode of the lights in the scene.
import { Light } from "@babylonjs/core/Lights/light";light.lightmapMode = Light.LIGHTMAP_DEFAULT;This causes the lightmap texture to be blended after the lighting from this light is applied.
import { Light } from "@babylonjs/core/Lights/light";light.lightmapMode = Light.LIGHTMAP_SPECULAR;This is the same as LIGHTMAP_DEFAULT except only the specular lighting and shadows from the light will be applied.
import { Light } from "@babylonjs/core/Lights/light";light.lightmapMode = Light.LIGHTMAP_SHADOWSONLY;This is the same as LIGHTMAP_DEFAULT except only the shadows cast from this light will be applied.
Lightmaps ExampleProjection Texture
In some cases, it is useful to define the diffuse color of the light (Diffuse gives the basic color to an object) from a texture instead of a constant color. Imagine trying to simulate the light effects inside a cathedral. The light going through the stained glass will be projected onto the ground. The same is true for light coming from a projector or the light effects you see in a disco.
In order to support this feature, you can rely on the projectionTexture property of the lights. This is only supported by the SpotLight so far.
import { SpotLight } from "@babylonjs/core/Lights/spotLight";import { Texture } from "@babylonjs/core/Materials/Textures/texture";import { Vector3 } from "@babylonjs/core/Maths/math.vector";const spotLight = new SpotLight("spot02", new Vector3(30, 40, 30), new Vector3(-1, -2, -1), 1.1, 16, scene);spotLight.projectionTexture = new Texture("textures/stainedGlass.png", scene);In order to control the projection orientation and range, you can also rely on the following properties:
projectionTextureLightNear: near range of the texture projection. If a plane is before this range in light space, there is no texture projection.projectionTextureLightFar: far range of the texture projection. If a plane is beyond this range in light space, there is no texture projection.projectionTextureUpDirection: helps define the light space, which is oriented toward the light direction and aligned with the up direction.
The projected information is multiplied against the normal light values to better fit Babylon.js lighting. It also affects only the diffuse value. So, it might be necessary to change the specular color of the light to better fit the scene.
IES Profile
Starting with Babylon v7.40.0, you can specify an IES light profile for your SpotLight.
This controls, based on the IES specification, how the light falloff should be rendered.
To do so, you have to set the spotLight.iesProfileTexture to a texture loaded from an .ies file.
import { Texture } from "@babylonjs/core/Materials/Textures/texture";light.iesProfileTexture = new Texture("https://assets.babylonjs.com/meshes/EXT_lights_ies/LightProfile.ies");