Selector
The Selection Panel Helper
A SelectionPanel contains groups of checkboxes, radio buttons, and sliders. Though it is not as versatile as building your own interface with a custom arrangement of controls, it can be a quick way to construct a UI for changing scene parameters.
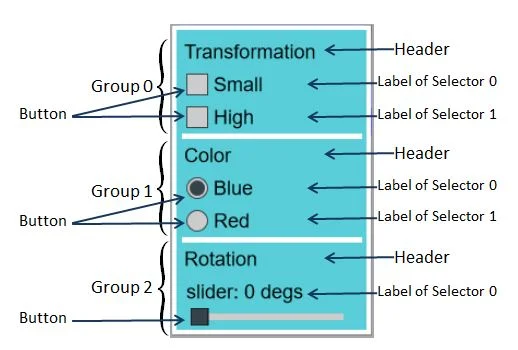 Fig 1
Fig 1
Referencing a Selection Panel
As you can see in Fig 1, a selection panel rectangle contains a vertical arrangement of groups numbered from the top, starting at 0. Each group contains a header and a variable number of selectors. Each selector consists of a button and a label. Within any one group, all selectors must be of the same type. You can refer to a selector by its group number and then its position within the group. So the checkbox labelled High has reference 0, 1, i.e. group 0, selector 1.
NOTE Adding or removing groups or selectors will change the reference number. The reference number always refers to the current position of the group and selector.
Creating a Selection Panel
As usual with GUI containers, you need to create an advanced dynamic texture to add the selection panel to. You can set the dimensions and position of the selection panel. The format for constructing a blank selection panel is:
import { SelectionPanel } from "@babylonjs/gui/2D/controls/selector";new SelectionPanel(name);After construction, you can add groups of selectors. Each newly added group is placed below any existing groups. For example:
import { AdvancedDynamicTexture } from "@babylonjs/gui/2D/advancedDynamicTexture";import { Control } from "@babylonjs/gui/2D/controls/control";import { SelectionPanel } from "@babylonjs/gui/2D/controls/selector";const advancedTexture = AdvancedDynamicTexture.CreateFullscreenUI("UI");const selectBox = new SelectionPanel("selectBox");selectBox.width = 0.25;selectBox.height = 0.52;selectBox.horizontalAlignment = Control.HORIZONTAL_ALIGNMENT_LEFT;selectBox.verticalAlignment = Control.VERTICAL_ALIGNMENT_BOTTOM;advancedTexture.addControl(selectBox);selectBox.addGroup(rotateGroup);selectBox.addGroup(transformGroup);selectBox.addGroup(colorGroup);In addition, if you have already constructed selector groups, you can pass them in an array when you create the selection panel. The format for this is:
import { SelectionPanel } from "@babylonjs/gui/2D/controls/selector";new SelectionPanel(name, [selector groups])Example
import { AdvancedDynamicTexture } from "@babylonjs/gui/2D/advancedDynamicTexture";import { Control } from "@babylonjs/gui/2D/controls/control";import { SelectionPanel } from "@babylonjs/gui/2D/controls/selector";const advancedTexture = AdvancedDynamicTexture.CreateFullscreenUI("UI");const selectBox = new SelectionPanel("selectBox", [transformGroup, colorGroup, rotateGroup]);selectBox.width = 0.25;selectBox.height = 0.52;selectBox.horizontalAlignment = Control.HORIZONTAL_ALIGNMENT_LEFT;selectBox.verticalAlignment = Control.VERTICAL_ALIGNMENT_BOTTOM;advancedTexture.addControl(selectBox);Creating Groups
There are three types of groups—a checkbox group, a radio group, and a slider group—which are created using the structure:
new BABYLON.GUI.<Type>Group(header)For example
import { CheckboxGroup, RadioGroup, SliderGroup } from "@babylonjs/gui/2D/controls/selector";const transformGroup = new CheckboxGroup("Transformation");const colorGroup = new RadioGroup("Color");const rotateGroup = new SliderGroup("Rotation");Creating Selectors
Naturally, there are three types of selectors, and each can only be added to the appropriate group. External functions for each selector map value changes to scene object properties.
Checkbox and radio selectors are added to their groups using two parameters: a label name and the external function reference. An optional third parameter can set the initial checked state of the selector to true (the default value is false). A slider selector is added to its group with a number of parameters, the first two being, as before, a label name and a reference to the external function. Due to the nature of a slider, the following optional parameters can be set:
| Parameter | Description | Default |
|---|---|---|
| unit | a string describing the units used, e.g. degrees or metres | "Unit" |
| min | the minimum value for the slider | 0 |
| max | the maximum value for the slider | 100 |
| value | the start value for the Slider between min and max | 0 |
| onValueChange | the function used to format the value displayed | void |
New selectors are added below those already added.
Example usage
transformGroup.addCheckbox("Small", toSize);transformGroup.addCheckbox("High", toPlace);
colorGroup.addRadio("Blue", setColor, true);colorGroup.addRadio("Red", setColor);
rotateGroup.addSlider("Angle Y", orientateY, "degs", 0, 2 * Math.PI, 0, displayValue);rotateGroup.addSlider("Angle X", orientateX, "degs", 0, 2 * Math.PI, Math.PI, displayValue);
Selector Called Functions
Checkbox Selector
There is one function for each selector. Each requires a Boolean parameter, with actions depending on whether the control is checked.
Examples
import { Vector3 } from "@babylonjs/core/Maths/math.vector";const toSize = function (isChecked) { if (isChecked) { box.scaling = new Vector3(0.5, 0.5, 0.5); } else { box.scaling = new Vector3(1, 1, 1); }};const toPlace = function (isChecked) { if (isChecked) { box.position.y = 1.5; } else { box.position.y = 0.5; }};Radio Selector
Within a radio group, the same function is used for all selectors. The function requires a number parameter that matches the selector position so actions can be defined for each selector.
Examples
const setColor = function (but) { switch (but) { case 0: box.material = blueMat; break; case 1: box.material = redMat; break; }};Slider Selector
Each slider selector requires two functions, one to change scene object properties and one to set the display format within the slider label.
Examples
import { Tools } from "@babylonjs/core/Misc/tools";// Change meshconst orientateY = function (angle) { box.rotation.y = angle;};const orientateX = function (angle) { box.rotation.x = angle;};//Format valueconst displayValue = function (value) { return Tools.ToDegrees(value) | 0;};Customize the Selection Panel
Colors and Font
For consistency of appearance, you can change only the overall font and color of all headers, labels, and selector buttons.
Without any direct setting, the color of labels follows that of the selection panel.
It is possible to set the color of all headers, labels, separator bars and selector buttons and the background color of all selector buttons.
selectBox.color = "blue";selectBox.background = "#FFFF99";selectBox.barColor = "#4F7DF2";selectBox.headerColor = "blue";selectBox.buttonColor = "orange";selectBox.buttonBackground = "#684502";selectBox.labelColor = "brown";Individual headers and labels can have their text changed.
selectBox.setHeaderName("Move", 0);selectBox.relabel("Theta", 2, 0);Groups and Selectors
As stated earlier, you can add groups to the bottom of the selection panel at any time. You can also remove a group by referencing its position in the list, e.g.
selectBox.removeGroup(2);Note Groups below the removed group will have new positions and therefore need to be referenced by their new position.
In the same way a selector of the correct type can be added to the bottom of a group at any time using the add<Type> method.
transformGroup.addCheckbox("Across", toLeft);A selector can be removed from a group at any time using its position in the group, e.g.
transformGroup.removeSelector(1);colorGroup.removeSelector(0);rotationGroup.removeSelector(0);For a selector within a group that is contained within a selection panel, you can add a selector by using the group position and the correct parameters, e.g.
selectBox.addToGroupSlider(2, "Angle X", orientateX, "degs", 0, 2 * Math.PI, Math.PI, displayValue);And you can remove a selector by using its reference position, i.e. the group and selector position within the group. For example:
selectBox.removeFromGroupSelector(0, 0);Further reading
The Babylon GUI
Learn all about the Babylon.js 2D GUI system.
Scroll Viewer
Learn about Scroll Viewer in Babylon.js.
XML Loader
Learn about the Babylon.js XML Loader.

Babylon 3D GUI
Learn all about the Babylon.js 3D GUI System.