Camera Introduction
Cameras
Of the many cameras available in Babylon.js, the three most used are probably the Universal Camera, used for "first-person" movement, ArcRotateCamera, an orbital camera, and WebXRCamera, used for modern virtual reality experiences.
To allow user input, a camera must be attached to the canvas using:
camera.attachControl(canvas, true);The second parameter is optional and defaults to false, which prevents default actions on a canvas event. Set to true to allow canvas default actions.
Notes
Universal Camera
This was introduced with version 2.3 of Babylon.js and is controlled by the keyboard, mouse, touch, or gamepad depending on the input device used, with no need for the controller to be specified. This extends and replaces the Free Camera, the Touch Camera and the Gamepad Camera, which are all still available.
The Universal Camera is now the default camera used by Babylon.js, and it’s your best choice if you’d like to have an FPS-like control in your scene. All demos on babylonjs.com utilize the Universal Camera. Plug an Xbox controller into your PC and you'll be able to use it to navigate most of the demos.
The default actions are:
-
Keyboard - The left and right arrow keys move the camera left and right, and the up and down arrow keys move it forward and backward;
-
Mouse - Rotates the camera around its axes;
-
Touch - Swipe left and right to move the camera left and right, and swipe up and down to move it forward and backward;
-
Gamepad - Corresponds to the connected device.
Optional actions are:
- MouseWheel - The scroll wheel on a mouse or scroll actions on a touchpad. Adding Scroll Wheel to Universal Camera
Note
Using keys in the Playground requires you to click inside the rendering area to give it the focus.
Constructing a Universal Camera
import { UniversalCamera } from "@babylonjs/core/Cameras/universalCamera";import { Vector3 } from "@babylonjs/core/Maths/math.vector";// Parameters : name, position, sceneconst camera = new UniversalCamera("UniversalCamera", new Vector3(0, 0, -10), scene);// Targets the camera to a particular position. In this case the scene origincamera.setTarget(Vector3.Zero());// Attach the camera to the canvascamera.attachControl(canvas, true);Arc Rotate Camera
This camera always points toward a given target position and can be rotated around that target, with the target as the center of rotation. It can be controlled with cursors and a mouse, or with touch events.
Think of this camera as orbiting its target position, or more imaginatively as a satellite orbiting the Earth. Its position relative to the target ("Earth") can be set by three parameters:
- alpha (the longitudinal rotation, in radians),
- beta (the latitudinal rotation, in radians), and
- radius (the distance from the target).
Here is an illustration:
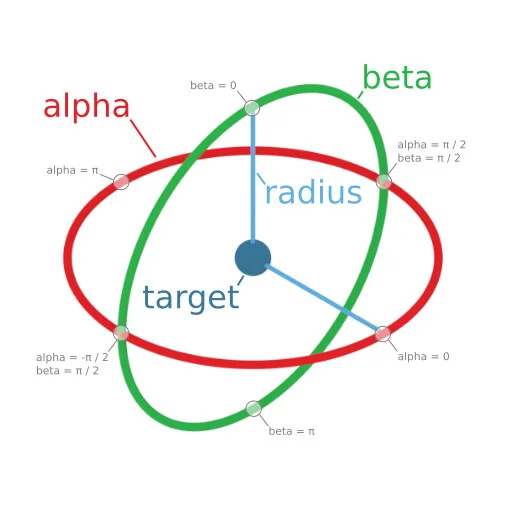
Setting beta to 0 or PI can, for technical reasons, cause problems, so in this situation, beta is offset by 0.1 radians (about 0.6 degrees).
beta increases in a clockwise direction, while alpha increases counter-clockwise.
The position of the camera can also be set from a vector, which will override any current value for alpha, beta and radius. This can be much easier than calculating the required angles.
Whether using the keyboard, mouse, or touch swipes, left/right directions change alpha, and up/down directions change beta.
The following optional ArcRotateCamera properties can also be handy:
-
zoomToMouseLocation - if set to
truewill cause mouse wheel to zoom in or out centered on current mouse location instead of a fixed camera.target location. This makes it easy to explore all corners of a large scene. Setting this means that the mouse wheel input controller will be changing the camera.target position during mouse wheel zooming. When this istruethe zoom operation using the mouse wheel is doing both zooming and a small amount of panning at the same time. -
wheelDeltaPercentage - if set to non-zero value will cause the zooming amount to be set to a percentage of the camera radius. This means the zoom slows down as you get closer to the target object which is nice because it means you can be more precise about camera placement while you explore your object up close.
Here's a Playground that shows how the camera moves, including what happens when the upVector (direction that camera treats as "up") is changed:
ArcRotateCamera Rotation ExampleConstructing an Arc Rotate Camera
import { ArcRotateCamera } from "@babylonjs/core/Cameras/arcRotateCamera";import { Vector3 } from "@babylonjs/core/Maths/math.vector";// Parameters: name, alpha, beta, radius, target position, sceneconst camera = new ArcRotateCamera("Camera", 0, 0, 10, new Vector3(0, 0, 0), scene);// Positions the camera overwriting alpha, beta, radiuscamera.setPosition(new Vector3(0, 0, 20));// This attaches the camera to the canvascamera.attachControl(canvas, true);By default, panning with an ArcRotateCamera is also possible by using Ctrl + left mouse button. You can use right mouse button instead by setting useCtrlForPanning to false in the attachControl call:
camera.attachControl(canvas, noPreventDefault, useCtrlForPanning);If required, you can also completely deactivate panning by setting:
camera.panningSensibility = 0;Here's a demo demonstrating some of these things, along with other features of the ArcRotateCamera:
ArcRotateCamera Offset DemoFollowCamera
The FollowCamera does exactly what its name suggests. Give it a mesh as a target, and from whatever position it is currently at, it will move to a goal position from which to view the target. When the target moves, so will the Follow Camera.
The initial position of the Follow Camera is set when it is created, and the goal position is set with three parameters:
-
radius: the distance from the target
-
heightOffset: the height above the target;
-
rotationOffset: the goal angle in degrees around the target in the x-y plane.
The speed with which the camera moves to a goal position is set through its acceleration (cameraAcceleration) up to a maximum speed (maxCameraSpeed).
Constructing a Follow Camera
import { FollowCamera } from "@babylonjs/core/Cameras/followCamera";import { Vector3 } from "@babylonjs/core/Maths/math.vector";// Parameters: name, position, sceneconst camera = new FollowCamera("FollowCam", new Vector3(0, 10, -10), scene);// The goal distance of camera from targetcamera.radius = 30;// The goal height of camera above local origin (centre) of targetcamera.heightOffset = 10;// The goal rotation of camera around local origin (centre) of target in x y planecamera.rotationOffset = 0;// Acceleration of camera in moving from current to goal positioncamera.cameraAcceleration = 0.005;// The speed at which acceleration is haltedcamera.maxCameraSpeed = 10;// This attaches the camera to the canvascamera.attachControl(canvas, true);// NOTE:: SET CAMERA TARGET AFTER THE TARGET'S CREATION AND NOTE CHANGE FROM BABYLONJS V 2.5// targetMesh created here.camera.target = targetMesh; // version 2.4 and earliercamera.lockedTarget = targetMesh; //version 2.5 onwardsAnaglyphCameras
The AnaglyphUniversalCamera and AnaglyphArcRotateCamera extend the Universal and Arc Rotate Cameras for use with red and cyan 3D glasses. They use post-processing filtering techniques.
Constructing an Anaglyph Universal Camera
import { AnaglyphUniversalCamera } from "@babylonjs/core/Cameras/Stereoscopic/anaglyphUniversalCamera";import { Vector3 } from "@babylonjs/core/Maths/math.vector";// Parameters : name, position, eyeSpace, sceneconst camera = new AnaglyphUniversalCamera("af_cam", new Vector3(0, 1, -15), 0.033, scene);Constructing an Anaglyph ArcRotateCamera
import { AnaglyphArcRotateCamera } from "@babylonjs/core/Cameras/Stereoscopic/anaglyphArcRotateCamera";import { Vector3 } from "@babylonjs/core/Maths/math.vector";// Parameters : name, alpha, beta, radius, target, eyeSpace, sceneconst camera = new AnaglyphArcRotateCamera("aar_cam", -Math.PI / 2, Math.PI / 4, 20, Vector3.Zero(), 0.033, scene);The eyeSpace parameter sets the amount of shift between the left-eye view and the right-eye view. Once you are wearing your 3D glasses, you might want to experiment with this float value.
You can learn all about anaglyphs by visiting a Wikipedia page that explains it thoroughly.
Device Orientation Camera
The DeviceOrientationCamera is specifically designed to react to device orientation events such as a modern mobile device being tilted forward, back, left, or right.
Constructing a Device Orientation Camera
import { DeviceOrientationCamera } from "@babylonjs/core/Cameras/deviceOrientationCamera";import { Vector3 } from "@babylonjs/core/Maths/math.vector";// Parameters : name, position, sceneconst camera = new DeviceOrientationCamera("DevOr_camera", new Vector3(0, 0, 0), scene);// Targets the camera to a particular positioncamera.setTarget(new Vector3(0, 0, -10));// Sets the sensitivity of the camera to movement and rotationcamera.angularSensibility = 10;camera.moveSensibility = 10;// Attach the camera to the canvascamera.attachControl(canvas, true);Virtual Joysticks Camera
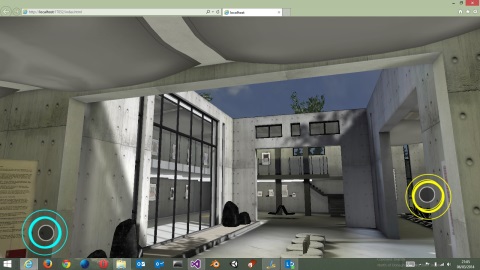
The VirtualJoysticksCamera is specifically designed to react to virtual joystick events. Virtual joysticks are on-screen 2D graphics that are used to control the camera or other scene items.
Video
Complete sample
Here is a complete sample that loads the Espilit demo and switches the default camera to a virtual joysticks camera:
import { VirtualJoysticksCamera } from "@babylonjs/core/Cameras/virtualJoysticksCamera";import { Engine } from "@babylonjs/core/Engines/engine";import { LoadSceneAsync } from "@babylonjs/core/Loading/sceneLoader";document.addEventListener("DOMContentLoaded", startGame, false);function startGame() {  if (Engine.isSupported()) {    const canvas = document.getElementById("renderCanvas");    const engine = new Engine(canvas, true);
    LoadSceneAsync("Espilit/Espilit.babylon", engine).then(function (newScene) {
      const VJC = new VirtualJoysticksCamera("VJC", newScene.activeCamera.position, newScene);      VJC.rotation = newScene.activeCamera.rotation;      VJC.checkCollisions = newScene.activeCamera.checkCollisions;      VJC.applyGravity = newScene.activeCamera.applyGravity;
      // Wait for textures and shaders to be ready      newScene.executeWhenReady(function () {        newScene.activeCamera = VJC;        // Attach camera to canvas inputs        newScene.activeCamera.attachControl(canvas);        // Once the scene is loaded, just register a render loop to render it        engine.runRenderLoop(function () {          newScene.render();        }),      }),    });,  }}
If you switch back to another camera, don’t forget to call dispose() first. The VirtualJoysticks are creating a 2D canvas on top of the 3D WebGL canvas to draw the joysticks with cyan and yellow circles. If you forget to call dispose(), the 2D canvas will remain and will continue to handle touch events.
VR Device Orientation Cameras
The VRDeviceOrientationFreeCamera, VRDeviceOrientationArcRotateCamera, and VRDeviceOrientationGamepadCamera are a newer set of cameras that extend the cameras above to handle device orientation from a VR device.
Example (requires a VR device):
VR Device Orientation Camera ExampleConstructing a VR Device Orientation Free Camera
import { VRDeviceOrientationFreeCamera } from "@babylonjs/core/Cameras/VR/vrDeviceOrientationFreeCamera";import { Vector3 } from "@babylonjs/core/Maths/math.vector";// Parameters: name, position, scene, compensateDistortion, vrCameraMetricsconst camera = new VRDeviceOrientationFreeCamera("Camera", new Vector3(-6.7, 1.2, -1.3), scene);Constructing a VR Device Orientation Arc Rotate Camera
import { VRDeviceOrientationArcRotateCamera } from "@babylonjs/core/Cameras/VR/vrDeviceOrientationArcRotateCamera";import { Vector3 } from "@babylonjs/core/Maths/math.vector";// Parameters: name, alpha, beta, radius, target, scene, compensateDistortion, vrCameraMetricsconst camera = new VRDeviceOrientationArcRotateCamera("Camera", Math.PI / 2, Math.PI / 4, 25, new Vector3(0, 0, 0), scene);Constructing a VR Device Orientation Gamepad Camera
import { VRDeviceOrientationGamepadCamera } from "@babylonjs/core/Cameras/VR/vrDeviceOrientationGamepadCamera";import { Vector3 } from "@babylonjs/core/Maths/math.vector";// Parameters: name, position, scene, compensateDistortion, vrCameraMetricsconst camera = new VRDeviceOrientationGamepadCamera("Camera", new Vector3(-10, 5, 14));WebVR Free Camera
NOTE: WebVR has been removed from Babylon.js as of version 7.0. Please use WebXR instead.
The WebVRFreeCamera is no longer available. To create VR experiences, use the WebXR experience helper:
// Create a default XR experience with immersive VR supportconst xrHelper = await scene.createDefaultXRExperienceAsync({ floorMeshes: [ground],});See Introduction to WebXR for full documentation.
FlyCamera
FlyCamera imitates free movement in 3D space, think "a ghost in space." It comes with an option to gradually correct Roll, and also an option to mimic banked-turns.
Its defaults are:
-
Keyboard - The A and D keys move the camera left and right. The W and S keys move it forward and backward. The E and Q keys move it up and down.
-
Mouse - Rotates the camera about the Pitch and Yaw (X, Y) axes with the camera as the origin. Holding the right mouse button rotates the camera about the Roll (Z) axis with the camera as the origin.
Constructing a Fly Camera
import { FlyCamera } from "@babylonjs/core/Cameras/flyCamera";import { Vector3 } from "@babylonjs/core/Maths/math.vector";// Parameters: name, position, sceneconst camera = new FlyCamera("FlyCamera", new Vector3(0, 5, -10), scene);// Airplane like rotation, with faster roll correction and banked-turns.// Default is 100. A higher number means slower correction.camera.rollCorrect = 10;// Default is false.camera.bankedTurn = true;// Defaults to 90° in radians in how far banking will roll the camera.camera.bankedTurnLimit = Math.PI / 2;// How much of the Yawing (turning) will affect the Rolling (banked-turn.)// Less than 1 will reduce the Rolling, and more than 1 will increase it.camera.bankedTurnMultiplier = 1;// This attaches the camera to the canvascamera.attachControl(canvas, true);Clipping Planes and Infinite Perspective
Cameras in Babylon.js have clipping planes that specify a visual range in the scene that will be rendered. Anything outside of that range will not be rendered. For example, setting the camera's far clipping plane to 100 like this:
camera.maxZ = 100;will not render anything past 100 units from the camera. The same is true of the near clipping plane as well. For example, setting the near clipping plane to 10 like this:
camera.minZ = 10;will not render anything closer than 10 units from the camera.
In some cases, you may not want to clip the rendering of your scene. You may want your scene to effectively render out to infinity. This can be done by setting the far clipping plane to 0 like this:
camera.maxZ = 0;Just a friendly warning, setting the far clipping plane to infinity can reduce depth precision, so use this carefully!
Customizing inputs
The cameras rely upon user inputs to move the camera. If you are happy with the camera presets Babylon.js is giving you, just stick with it.
If you want to change user inputs based on user preferences, customize one of the existing presets, or use custom input mechanisms. Those cameras have an input manager that is designed for these advanced scenarios. Read customizing camera inputs to learn more about tweaking inputs on your cameras.
Correcting perspective projection
If you are doing applications like architectural rendering, you may encounter the need to compensate for perspective tilting of vertical lines.
Let's consider this case: you are rendering a tall building from a human eye point of view. Naturally, vertical lines will converge toward a vanishing point, like in this playground: 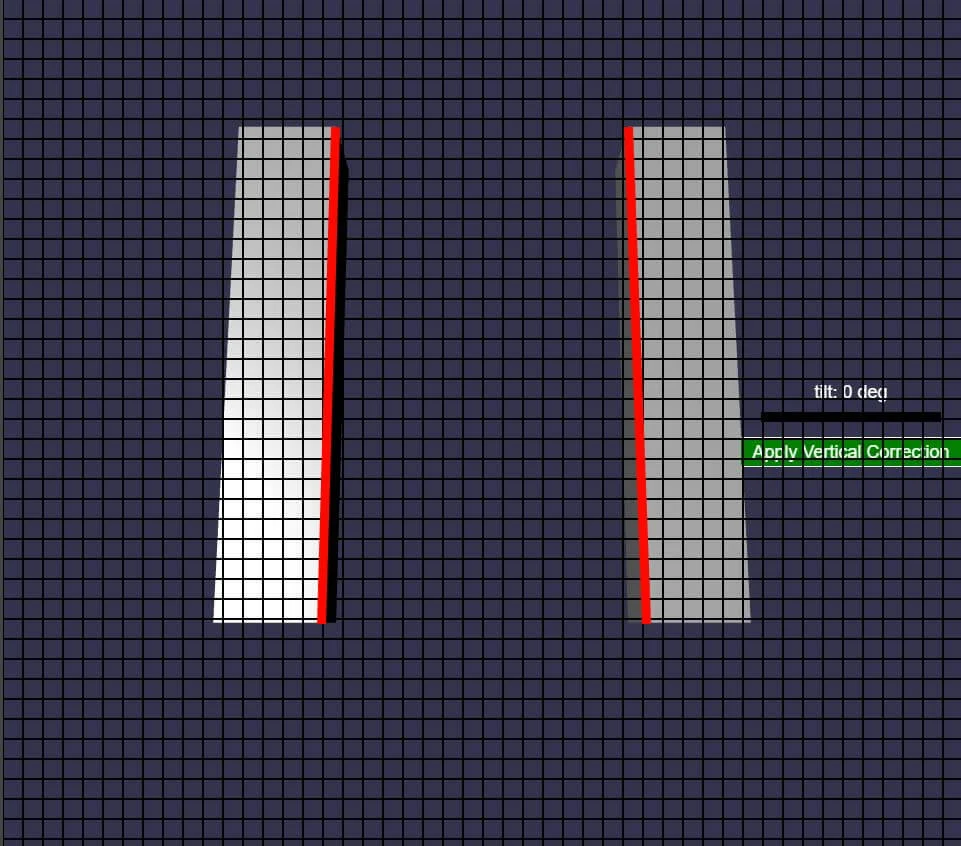 .
.
While this is realistic, it may be visually unappealing. If the angle between those lines stays quite low, it may be worth considering perspective correction using camera.applyVerticalCorrection(). This method will automatically compute the vertical correction to apply based on the current camera pitch angle: 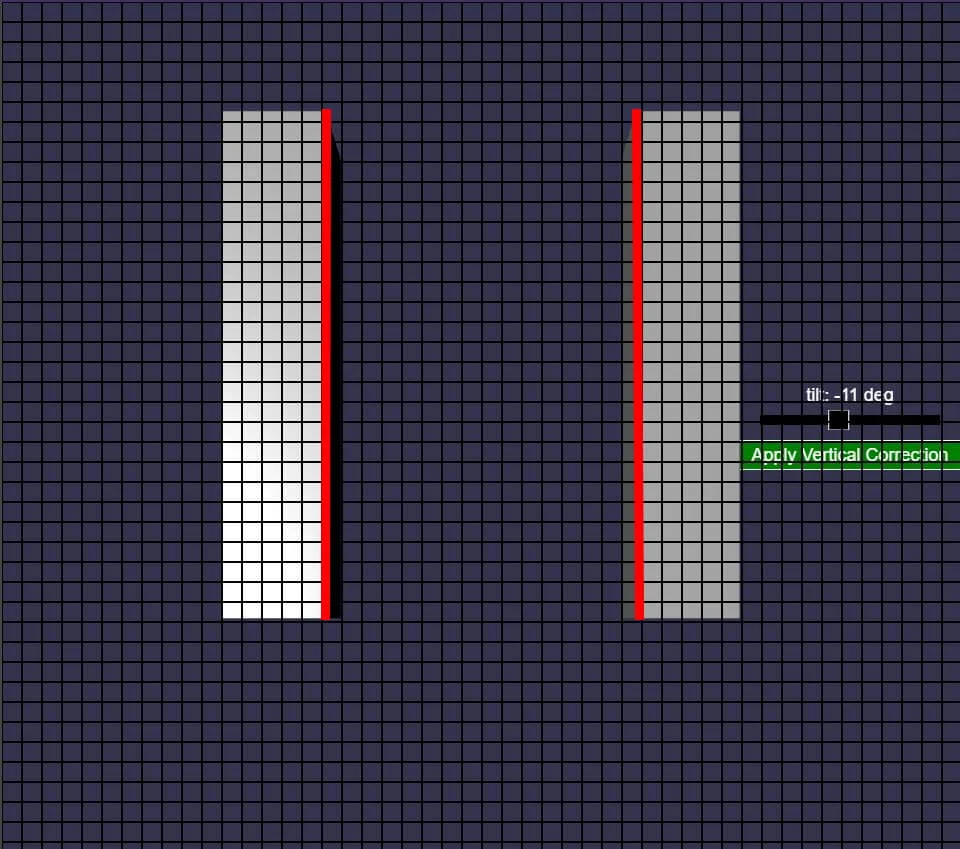 .
.
And if you want further control over the camera projection plane tilt, you can adjust the camera.projectionPlaneTilt property.
See this forum post for more information.