Adding Major Changes to the Documentation
Major Changes
When a simple page edit is not enough—for example, when you want to add new pages or run the documentation locally on your computer before pushing online to be sure nothing is broken—there are a number of steps to complete.
Requirements:
- GitHub account
- git
- GitHub Desktop (optional, but makes local git repositories easier to use)
- node.js, we support node 16 and up.
- An IDE such as VSCode
You will need to know how to fork the Documentation repository and clone it onto your local system.
Running and editing the doc locally
Using a CLI in your local Documentation folder, run:
npm install
This will install the dependencies needed for the project. You can now run:
npm run dev
This will launch the dev server on http://localhost:3000
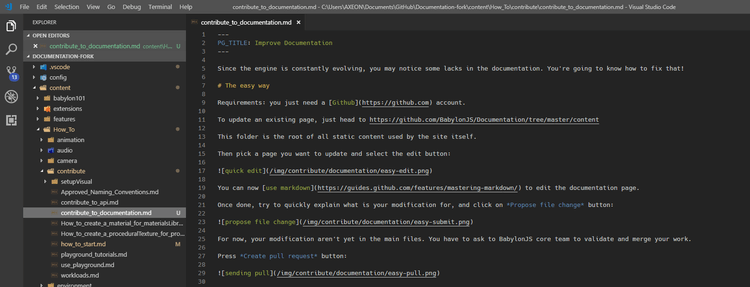
Open the project using your favorite code editor. This can also be done from GitHub Desktop:
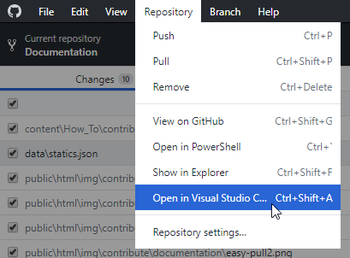
(you may have Open in Atom rather than Open in Visual Studio , that's not a big deal)
You can finally start to update the markdown files!
Adding new images
If you need to create new illustrations, you should add them to the GitHub repo in a specific folder: Documentation/public/img/.
So on your local fork, go to this img folder. You can see there are already a lot of folders, so try to use existing folders to put your new images if possible.
Let's say you just created a new page, linked at https://doc.babylonjs.com/features/divingDeeper/my_very_great_page.
Here, you can create a my_very_great_page folder inside /img/features/divingDeeper/ and put my-wonderful-image.jpg into it.
Then, on your markdown page, use this link pattern:
Of course, try to keep the image size as small as you can (while keeping a good visual quality). Our build system will do its best to optimize the image nonetheless.
Adding new pages
Page structure
Now that everything is working well, you may want to add new content. To do so, please open /configuration/structure.json.
This file is a catalog where you can reference new files added to the repo.
The file is a tree of documents, starting from the root page and going to the different sections. Each page can, but does not have to, have its own children.
For example, let's say we want to add this page. We know that our new page will be in the Diving Deeper/Audio section:
{ "friendlyName": "Home Page", "content": "landing_pages/home", "children": { /* [...] */ "divingDeeper": { "friendlyName": "Diving Deeper", "children": { /* [...] */ "audio": { "friendlyName": "Audio", "children": { "playingSoundsMusic": { "friendlyName": "Playing Sounds and Music", "children": {}, "content": "How_To/audio/Playing_sounds_and_music" }, // This is the place you will add your document }, "content": "landing_pages/features/divingDeeperAudioLandingPage" }, } } /* [...] */}Just add the necessary information about your new page:
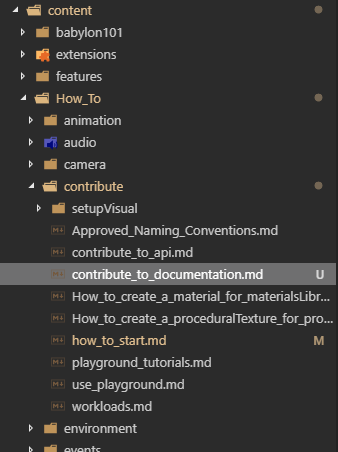
/* [...] */"documentKeyAndUrl": { "friendlyName": "A friendly title to your document", "children": {/* if any, children will contain the rest of the documents */}, "content": "the markdown file that correlates to this document."},/* [...] */Notice the object's key. This will be your new page filename (without the .md extension):
Page metadata
Each page can, but does not have to, have a metadata section that provides further information for the page. This is important if you want the page to be visible in search results. The metadata section is YAML added to the top of the page:
---title: Page title, if you want to override the title from the structure fileimage: A link to an image that will be used as this page's imagedescription: A short description for this pagekeywords: comma-separated keywords for this page.further-reading: A list of links to add at the end of this page. Can be internal or external linksvideo-overview: A youtube video id to show at the beginning of this pagevideo-content: a list of videos (youtube or files) to show at the end of the page.---For example, this is a part of the metadata in the node_material page:
---title: Node Materialimage: /img/pageImages/nodeMaterial.webpdescription: The Node Material is a simple, highly customizable material that you can build yourself piece by piece. Combined with the powerful node-based editor, you can easily create stunning custom GPU shaders and FX for your Babylon.js scenes.keywords: shaders, glsl, node editor, graphics, GPU program, material, NME, Node Material, Node Material Editorfurther-reading: - title: Dedicated NME Forum Examples url: https://forum.babylonjs.com/t/node-materials-examples/6048 - title: 3 Tips For Getting Started Building Procedural Node Material Shaders url: https://babylonjs.medium.com/procedural-node-material-shaders-3-tips-for-getting-started-4089c1832dfc - title: Mesh shattering with baked physics url: https://babylonjs.medium.com/mesh-shattering-with-baked-physics-5b3f8f381743 - title: Fighting Self-Doubt, with Watervideo-content: - title: Node-Based Procedural Textures url: https://youtu.be/qqMuuSM7GvI - title: Creating Procedural Node Materials Through Code url: https://youtu.be/GrmVObi6caQ - title: Node Material Post Processes url: https://youtu.be/QTuL5raapQQ - title: Node Material Editor Particles!!!! url: https://youtu.be/fZvZMXDoVp4 - title: Interactive Hex Tile Series url: https://www.youtube.com/playlist?list=PLsaE__vWcRamMC5oJwhrSj3x3jT9TWOPB - title: Unraveling Advanced Anisotropic Reflections---Everything in the metadata is optional and serves a different purpose. However, it is always better to add as much information as possible. This will help people find and use the page, and that is the goal here. The image provided will be used when sharing this link on sites supporting open graph, such as Facebook, Medium, Twitter, and so on. The default image is the Babylon.js logo.
Internal links
To link to an internal document, use its path from the root without adding the domain. For example:
[Post Processes](/features/featuresDeepDive/postProcesses/usePostProcesses)Adding examples
It is always great to provide examples on your documentation page. By using the correct Markdown, you can add playgrounds and NME, and they will be added automatically to the page's side menu. To add a playground, add the following code:
<Playground id="playgroundId" title="Playground title" description="A short description" image="Optional image url" />The playground ID is the 6-character id, and the version number if needed. For example: #Y642I8#2.
The same applies to NME examples:
<nme id="nmeId" title="NME title" description="A short description" />This can be either inline or on a new line and will automatically add the external and example link. An image will be generated for each playground without an image, so don't worry about screen-capturing your playground. Please commit those images along with your document!
Adding media (videos and images)
To add a YouTube link, use the YouTube markdown tag:
<Youtube id="qqMuuSM7GvI" />To add an image, you can use the markdown annotation:
but you can also use the more advanced <img/> tag, which gives you more control over formatting, size, and so on. As always, everything is optional, but very nice to have:
<img src="internal link to image" title="Image title" alt="Similar to title" width="300" height="200" caption="Copyright (or any other) caption that will appear under the image" />Sending pull request
A Pull Request (PR) must be made to integrate your modifications into the documentation.
You will first pull your local modifications into your online fork, then ask to merge your fork into the main repo.
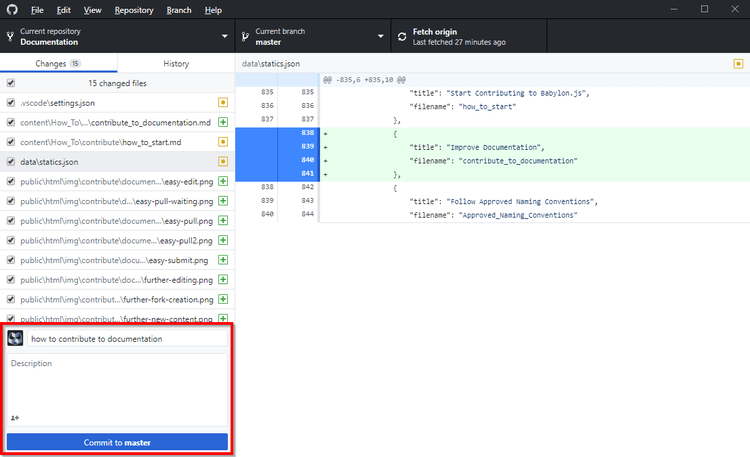
In GitHub Desktop, you will see all of your modifications. Sometimes a file named babylon.d.ts will automatically be modified, but it is okay to include it in the PR.
Add an explicit summary into the required field, and click to Commit to master:
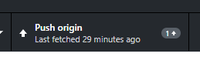
 Then, click the Push origin button:
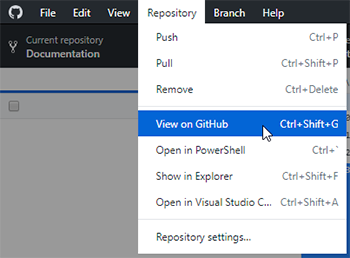
 Then go to your online GitHub repo. You can use GitHub Desktop for that:
 At this point, your fork is updated online with your latest modifications.
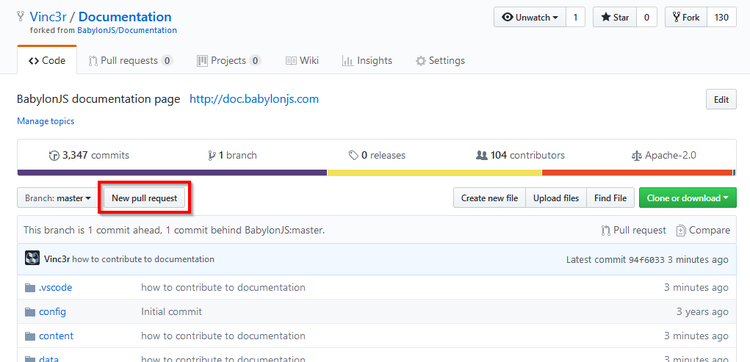
Click the New pull request button:
At this point, your fork is updated online with your latest modifications.
Click the New pull request button:
 If there are no conflicts, you will be able to follow the same steps as we saw above in the easy way section.
Congratulations again, you're now a documentation master!
If there are no conflicts, you will be able to follow the same steps as we saw above in the easy way section.
Congratulations again, you're now a documentation master!
Good Practices
General
- if you're not familiar with Markdown, you can read this short GitHub guide
- even if you're seeing just a tiny typo, feel free to do a pull request dedicated to it
- do one commit per task; a pull request can include multiple commits if needed
- example: if you have two pages to modify, once the first page is edited, do a commit
- tables can be a great help for readability
- avoid the use of first person
- pay attention to spelling, grammar, and punctuation
- when you're not sure about a point, ask for proofreading
Images
- use and store images from the documentation FTP as much as possible; read Adding new images
- be careful about image size (tip: Photoshop has a "Save for the web" export)
Code
-
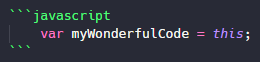
when showing a block of JavaScript or TypeScript, include the language name after the opening code block backticks to ensure syntax highlighting:
-
JavaScript and TypeScript fences that use the
BABYLONnamespace are automatically displayed with ES6, ES6 pure (when supported), and UMD tabs. Keep only the UMD form in the Markdown so the variants cannot drift apart. -
Pure imports do not register engine extensions, loaders, serializers, or prototype augmentations automatically. Examples can assume application-level setup, but pages that teach setup should show the relevant explicit registration.
-
Add
no-code-variantsafter the fence language only when the snippet uses a community extension, removed API, or illustrative placeholder that has no ES module equivalent:```javascript no-code-variantsconst terrain = new BABYLON.DynamicTerrain(...);``` -
when quoting a property in a sentence, you can use single ` char (Alt + numpad 96)
- example: You can set the
roughnessof a PBR material to 1.
- example: You can set the
Links
For links to other parts of the Babylon.js documentation and API, use relative links.
For example, use [Load Files with Assets Manager](/contribute/contributeToDocs) rather than [Load Files with Assets Manager](https://doc.babylonjs.com/contribute/contributeToDocs)
Further Reading
Any articles, URLs, documents, and links that you'd like the reader to have as a reference on the page should go into the "further reading" metadata section at the top of the page. See Page Metadata for more detail.