Creating and understanding workspaces
Creating a workspace.
Creating an empty workspace
Using the Editor, the first step is to create a new workspace. The workspace allows you to manage workspace-based settings and multiple projects. It is important to understand that the Editor can't work without a workspace, as it allows you to link scenes with code, export final scenes to the right place, etc.

Once the Editor starts, a welcome page appears and allows you to:
- Open an existing workspace
- Open a recent project (contains the last 3 opened workspaces)
- Create a new workspace.
Let's create a new Empty workspace. This will ask for:
- A port for the local webserver. Any port can be chosen, and the game will be served at
http://localhost:PORT/index.html - Watch project using Webpack: projects made with the Editor use the latest ES6 modules of Babylon.JS. The workspace comes with a default configuration using Webpack to build the final dist files. This configuration can be customized. Enabling this option will make the Editor automatically watch the project's source files for us. This is especially useful when we don't need to open any code editor or terminal and just use the Editor.
Finally, let's select an empty folder where the workspace will be created, and the Editor will load the newly created workspace:
Understanding the first launch of a workspace
By default, a newly created workspace contains only basic files (assets, source files, etc.). But, to be able to build the project and compile the source files, the dependencies must be installed using npm.
On the first launch of a workspace, the Editor will install the dependencies (TypeScript, WebPack, Babylon.JS, etc.) and then build the project (using WebPack). This can take a while depending on the machine where the Editor is running.
Understanding the workspace architecture
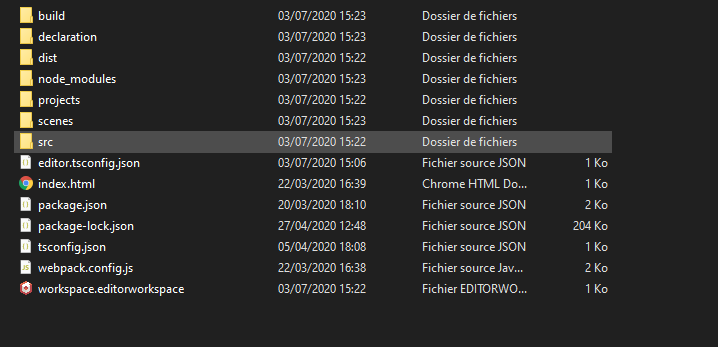
The architecture of a workspace follows the basics of web projects:
package.jsondescribes the workspace and enumerates its dependencieswebpack.config.jsdescribes the configuration of the builder (here using WebPack)tsconfig.jsondescribes the TypeScript configurationssrcfolder contains all TypeScript files. In other words, this folder contains all the application's sourcesprojectsfolder contains the list of all available projects in the workspacescenesfolder contains all the final scenes (with their files) exported by the Editor. In other words, these exported scenes will be the ones loaded when running the application/game made using the Editor.
Understanding package.json
The package.json file is the main entry point of the project. It contains the list of all dependencies and a list of predefined scripts for the project.
Of course, all these dependencies and scripts can be modified/customized/removed to satisfy the project's requirements. For example, for a multiplayer game, the package socket.io (this is just an example) can be added to the dependencies and the "webserver" script can be modified to run a custom webserver instead of using the simple http-server command.
Only the "build" script is mandatory and must be available in the package.json file. It must also keep its role, which is to build the project, even if the project is fully customized.
Understanding webpack.config.js
Like the package.json file, the Webpack configuration file can be customized to include whatever is needed by the project. By default, it packs the project into a single file ("bundle.js") ready to be imported/called by the index.html file.
According to the user's preferences, it is possible to use Webpack plugins (including custom plugins) such as the dev server (more information here: https://webpack.js.org/configuration/dev-server/).
In fact, the webpack.config.js file must support both "build" and "watch" modes, as the Editor allows us to automatically build/watch the project instead of typing the commands ourselves. Of course, build and watch commands can be handled ourselves if needed using custom commands. For example:
npm run watchOr
npm run build