Babylon.js and Ionic Angular
A brief example showing how to use Babylon.js in an Ionic 2 application
For anyone interested, it is possible to integrate Babylon.js into an Ionic/Cordova app in just a few easy steps. The following is simply a narrative of how I did it. Since it has been a trial-and-error process, there is probably a better way to do it. When in doubt, I went for simplicity rather than optimization.
What you need
First, you need node/npm installed. For more on that look here.
Second, and quite obviously, a working Ionic environment. How to do this is very well documented by the Ionic people so, if you haven't done it before have a look there.
The process
-
Start a new Ionic project, I used the blank template, which provides a basic scaffolding, and removed all unnecessary stuff.
-
Then, install Babylon.js within the project:
npm install babylonjs@2.5.0 --saveA couple things to remember:
- Be careful not to write babylon (different package, yes it happened to me!).
- Specify version, otherwise npm will install the preview branch and things will fall apart at runtime!
- Go to the last line of babylon.d.ts (in node_modules/babylonjs/dist) and type:
export = BABYLON;These last two steps will create the proper entry in the node_modules folder and will let you do:
wherever you need to.
-
Depending on what you intend to do in your app, other dependencies might be needed (e.g. cannon.js or hand.js). You could install them the same way as Babylon.js, but I just downloaded the JavaScript files, saved them in the
wwwfolder, and referenced them using script tags inindex.html. However, this has a downside: thewwwfolder is generated after transpiling, so you will need to add those JavaScript files manually. -
After this, I generated an Angular Provider. This is a singleton class that wraps our Babylon.js engine:
ionic g providerBabylon.jsBesides holding our Engine instance, being in a provider allows for different pages to access the same Engine, e.g. you define different scenes in different pages and use the same Engine provider for all.
-
Another provider (
ConfigProvider) is created to handle all necessary configuration variables. In this case, it just contains the dice colors and texture for both dice.Actually, when you look at it, a Provider is a regular TypeScript class, nothing really special apart from the @Injectable decorator, which tells Angular that this is a special class to be injected during the bootstrap process and made available to the hierarchy of components that make up an app.
-
The very basic configuration interface is an Ionic page showing the available options. Note the header, a basic Ionic component that handles the back button automatically.
All the values are stored in the Config service, which makes them available to any page that declares a dependency on the Config provider. -
The Home page will contain the Babylon.js canvas. An Ionic page is basically an Angular component with some sugar added, mainly in the form of a few helpful life cycle hooks.
The whole scene is created here, note that we are using the two providers that were previously generated.
The ViewChild decorator is needed in order to access the canvas element. Think of it as Angular's equivalent of the good olddocument.getElementByIdmethod.
A few notes on the code
The app itself is a very basic, no-frills dice roller, but there are a few things worth mentioning:
- We are using Ionic components to provide a basic user interface, with a header and a couple FAB buttons to access the configuration screen and roll the dice. See the methods handling the button events.
- The Home page code makes use of
ionViewDidLoadandionViewWillEnter, both are Ionic hooks to the page life cycle. The first fires only once, when the view loads, so it is ideal to initialize variables and generate the scene proper.
The second fires every time the view is going to become active, it checks for possible changes in the configuration and modifies the vertex data to point to the correct coordinates if necessary. - Ionic, by default, caches the views, so anything included in the
ionViewDidLoadhook will run only once. As a result, the methodscreateScene()andanimate()are called only once. Caching can be disabled; in that case, this method will fire every time the view is loaded, and the scene will be generated anew.
Conclusion
Integrating Babylon.js into an Ionic application was easier than it seemed at first, once you get to know a couple of things about how Ionic/Angular 2 works. In fact, doing the same in an Ionic 1 app was easy too, but overall everything looks cleaner and more streamlined in the latest version.
However, despite the improvements introduced to Angular, the overhead of having both Ionic and Babylon.js together might make performance a bit sluggish. Maybe it's not the best way to implement a pure 3D action-packed game.
On the other hand, with Ionic you get things like a very simple way of handling the user interface, navigation, and storage out of the box. Not to mention that, through Cordova, it's easy to build apps for any mobile platform, so it might be the way to go for less demanding apps.
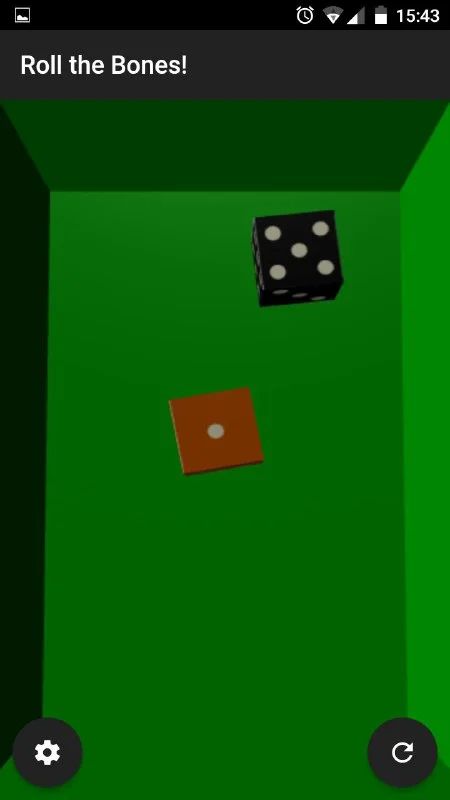
Finally, this is how the app looks running on an actual Android 6.0 device: